Introduction: Training a Custom YOLO Model for Logo Detection**
In the realm of AI and machine learning, the power of customization cannot be overstated. Our previous article covered deploying a pre-trained YOLOv8 model using SaladCloud’s infrastructure. During that journey we did real-time object tracking and analysis. In the landscape of AI and machine learning, the ability to train custom models for specific tasks opens up a world of possibilities. And now, we’re taking a step further: training a custom YOLO (You Only Look Once) model using SaladCloud . Running inference with pre-trained models, as we’ve previously seen, can be relatively less dependent on computational resources. However, when it comes to training custom models that changes significantly. Training is much more GPU-intensive, time-consuming, and often pretty expensive. This is particularly true for deep learning models used in object detection, where numerous parameters are fine-tuned over extensive datasets. The process involves repeatedly processing large amounts of data, making heavy use of GPU resources for extended periods. This intensity not only extends the training duration but also adds to the overall cost, especially in cloud-based environments. Acknowledging these challenges, our current project aims to train several YOLO models using different base models. We will be focusing on three critical aspects:- Processing Times: We will monitor the duration taken by each model to train, providing insights into the efficiency of different YOLO configurations.
- Cost Analysis: Given that training is a resource-heavy task, understanding the financial implications is crucial. We will compare the costs of training each model on SaladCloud’s platform, offering a clear perspective on the budgetary requirements for such tasks.
- Model Accuracy: The ultimate test of any model is its performance. We will evaluate the accuracy of each trained model, understanding how the training complexity translates into detection precision.
yaml
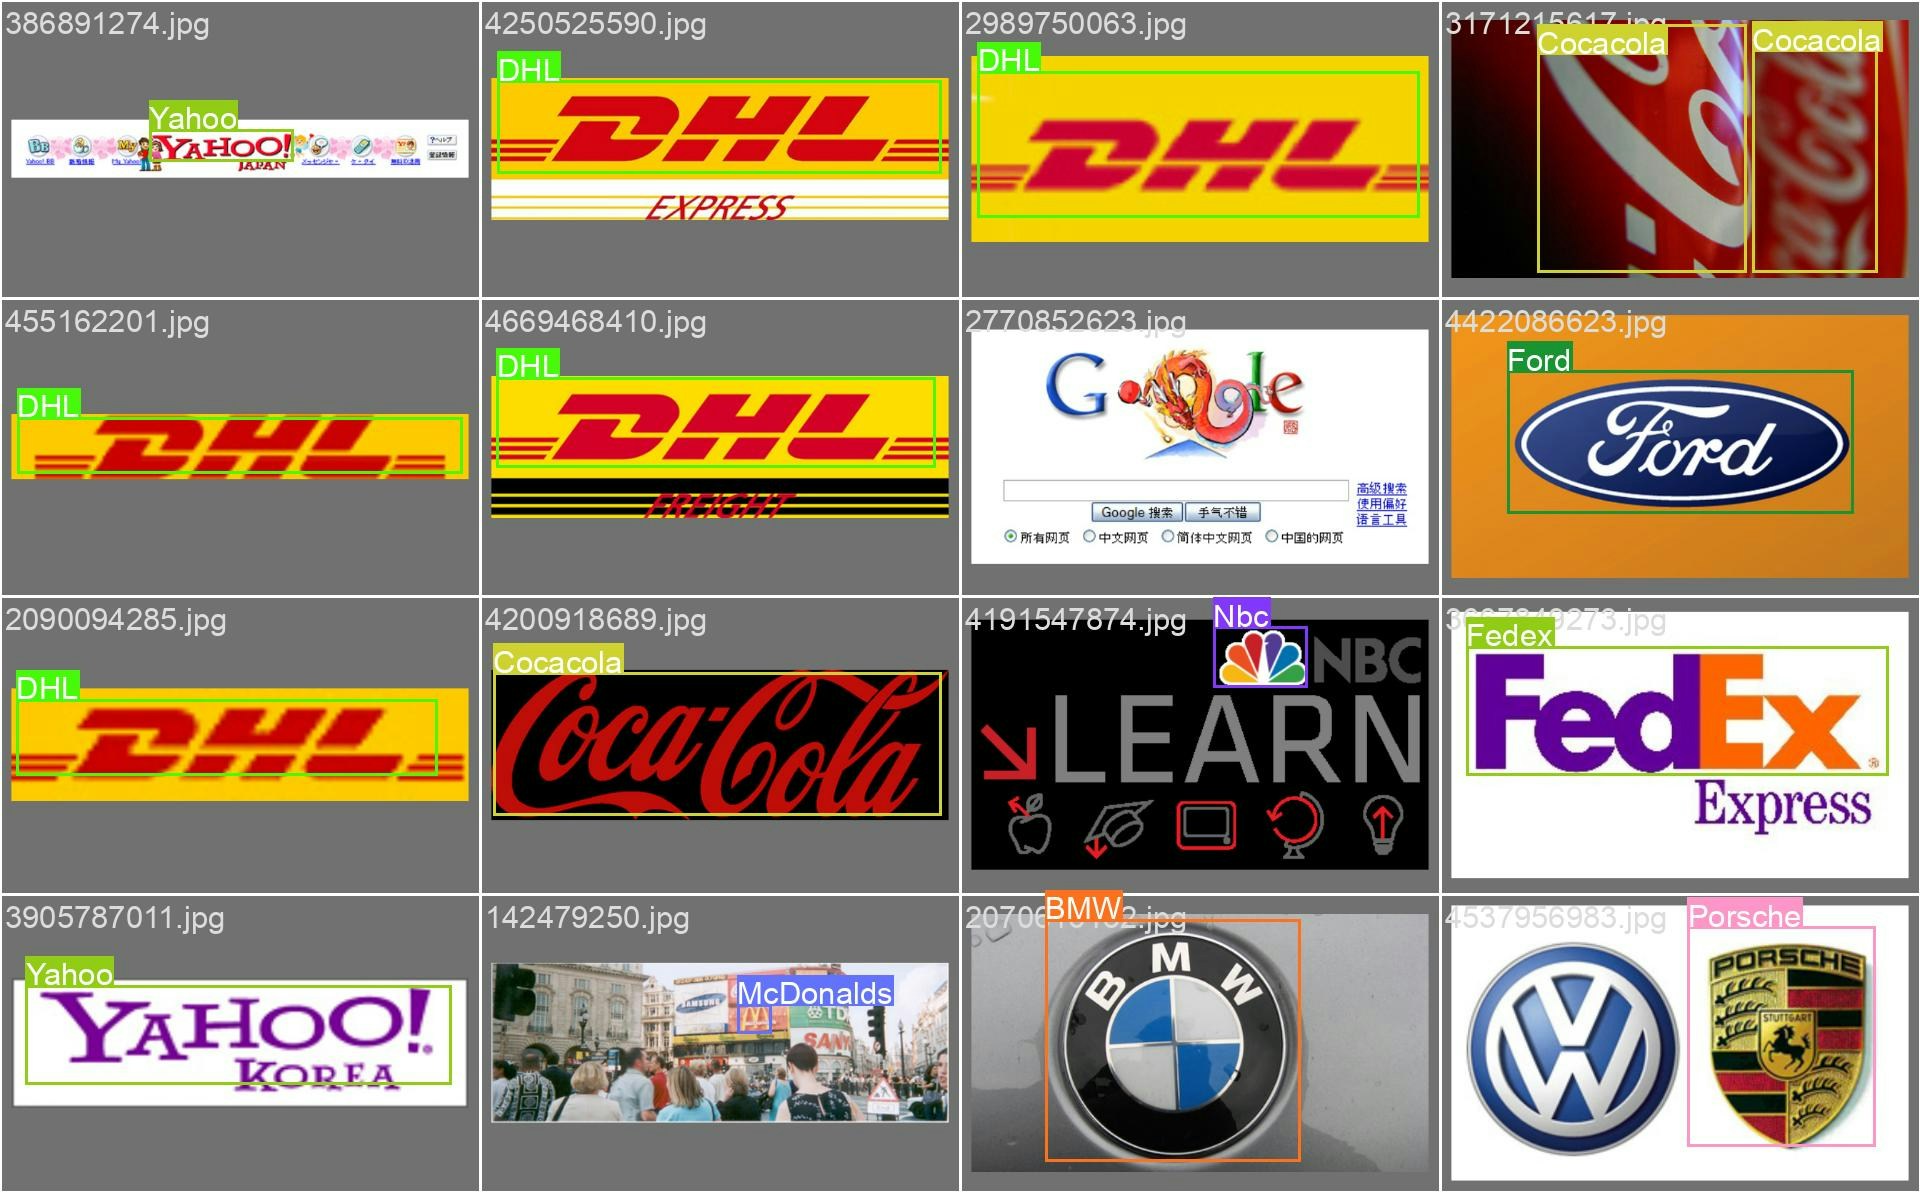
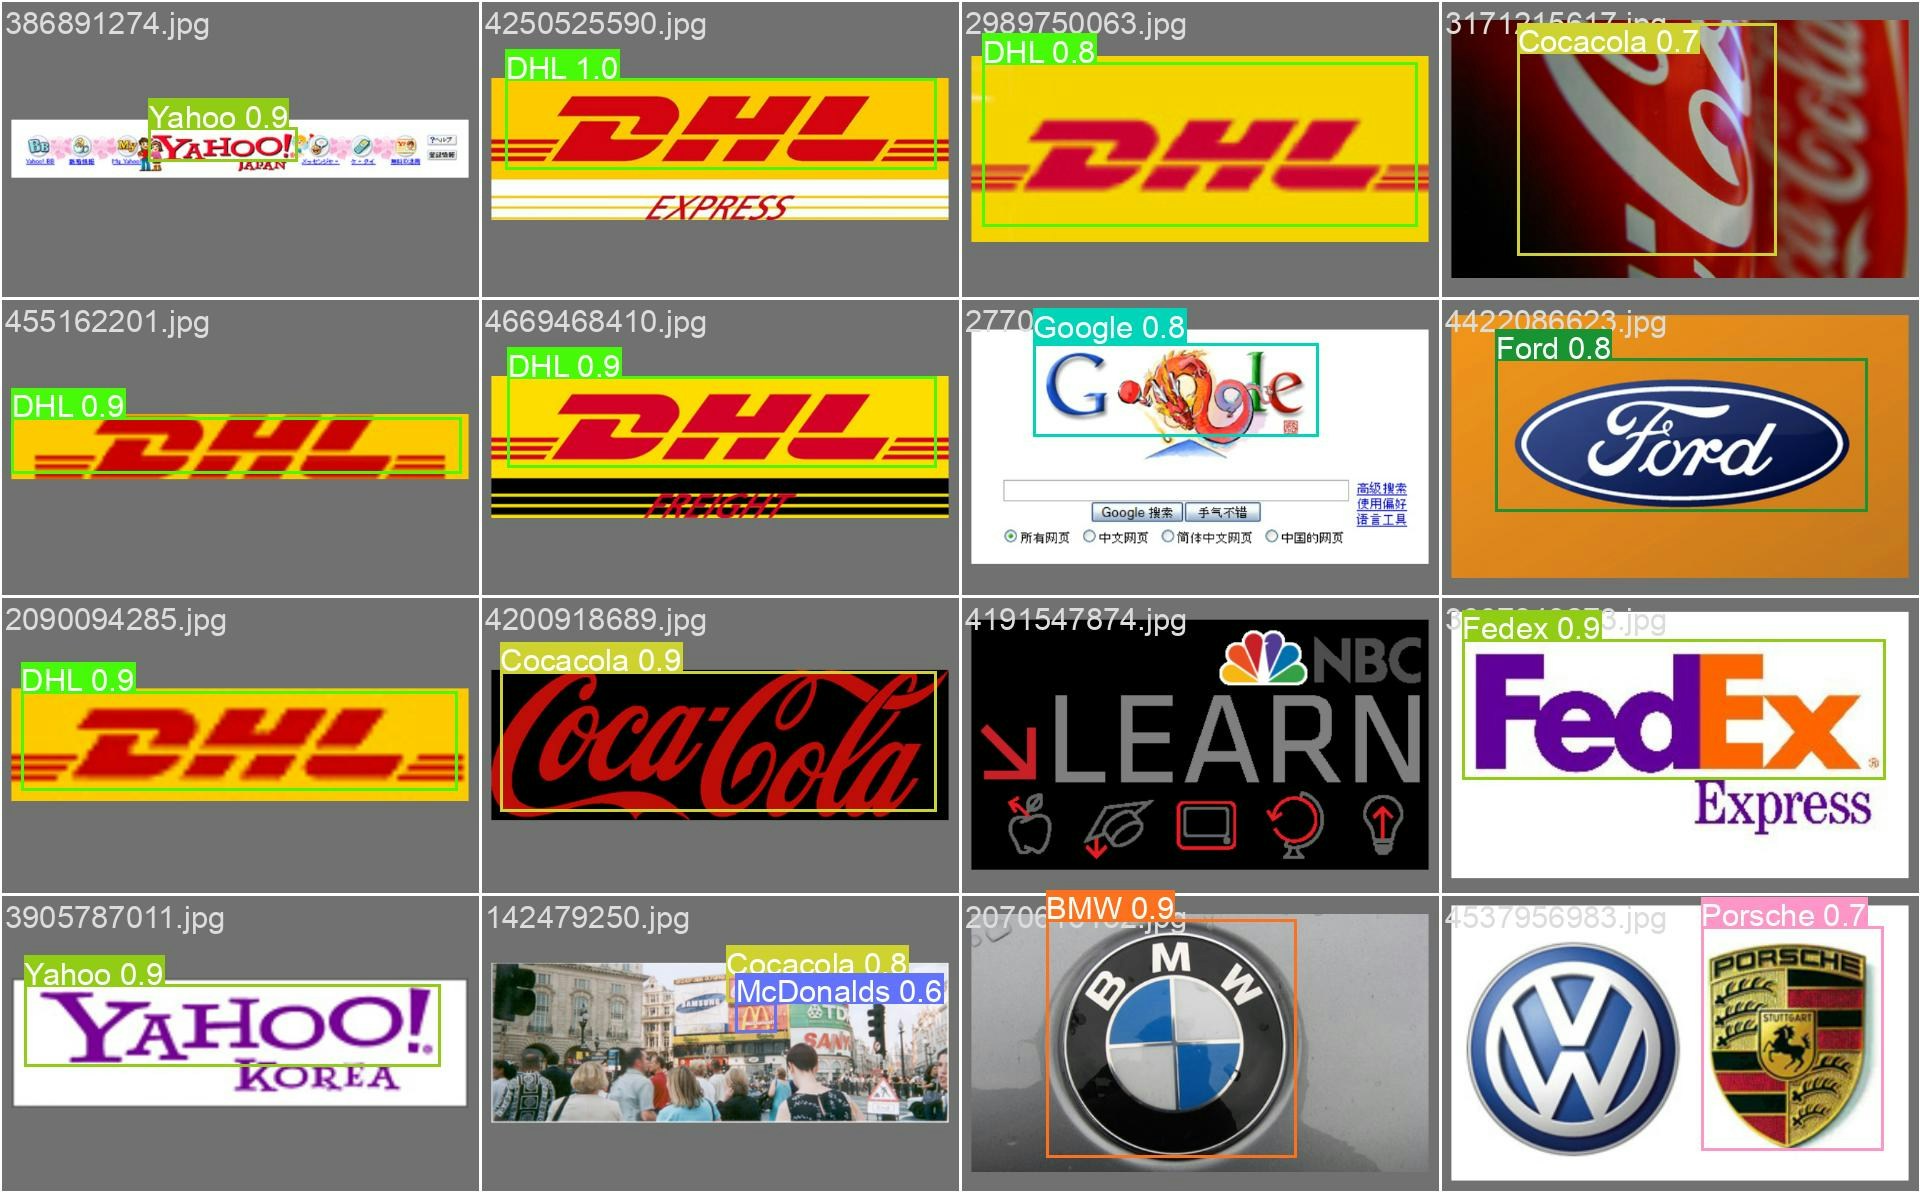
.txt file in YOLO format, detailing the objects present. These
annotations are crucial, as they provide the model with the necessary information about the location and class of each
logo in an image:
txt
txt
- YOLOv8 Nano (n)
- YOLOv8 Small (s)
- YOLOv8 Medium (m)
- Epochs: We will train each model for 50 epochs.
- Batch Size: To ensure consistency and fairness in our comparison, all models will be trained with a batch size of 8.
- Image Resolution: We will go with the default resolution of 640
- Workers : 1
- model: This specifies the YOLO model to be used. In our example, we use
yolov8n.pt, which refers to the YOLOv8 Nano model. - imgsz (Image Size): Defines the resolution of the input images for training. The default value is 640, but this can be adjusted based on the dataset and GPU capabilities.
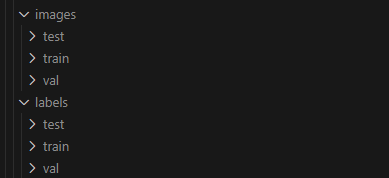
- data: The path to the YAML file containing the dataset configuration. This file includes paths to training, validation, and test image directories, and the class names.
- epochs: This determines the number of complete passes through the training dataset. We’ve set it to 10 for our example, but this can vary based on the size of your dataset and the desired level of model convergence.
- batch (Batch Size): Indicates the number of training samples to work through before updating the internal model parameters. The value depends on the available GPU memory; a higher batch size generally requires more memory.
- name: The name assigned to the training run. This is useful for organizing and identifying results, especially when conducting multiple experiments.
Resuming Interrupted Trainings
In the world of deep learning, resuming training from a saved state is a crucial feature. This feature is particularly beneficial when training is unexpectedly interrupted or when you wish to continue refining a model with additional data or more training epochs. YOLO simplifies the process of resuming training. When resuming, the model not only reloads the weights from the last saved checkpoint but also restores the optimizer state, learning rate scheduler, and the current epoch number. This seamless integration ensures that training can continue precisely from where it was paused. To resume training you simply need to use theresume argument within the training method and provide the path to the
.pt file containing the partially trained model weights. We will slightly modify the code checking if the intermediate
weight is available and start from where it stopped:
save_period argument is used. Therefore, to successfully resume a training session, you need to have
at least one completed epoch.
Creating a Persistent Training Environment with SaladCloud and Azure File Shares
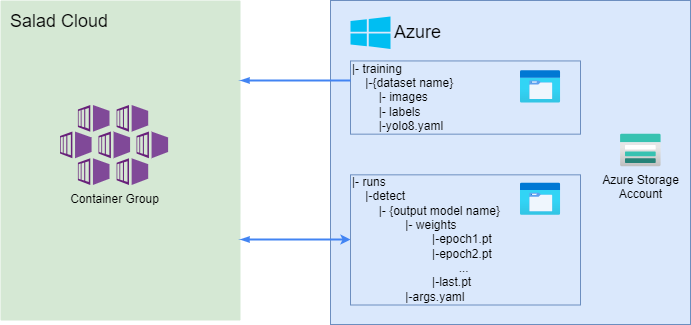
To ensure a smooth and uninterrupted training process on Salad, especially when dealing with containerized environments, it’s crucial to have a persistent storage solution. Azure File Shares provide an ideal way to maintain and access training data and model weights across different container sessions. In our setup, we utilize two Azure File Shares:runs and training.

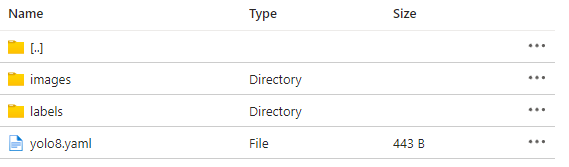
- Training Directory: Within the
trainingfile share, we have a sub-directory named{dataset_name}. This organization allows us to switch between different datasets efficiently, facilitating the training of various models without hassle. - Synchronizing Data: To manage and synchronize our training data and weights, we’ll employ a bash script as the
entry point for our
train.py. This script will automate several crucial tasks, ensuring our training process is both efficient and consistent.
- Download Training Data: The script will pull all necessary training data, including images, labels, and the YOLOv8 YAML configuration file, into our container.
- Retrieve Weights from Previous Runs: It will download weights from previous training runs to the container, ensuring continuity.
- Handle Training Process:
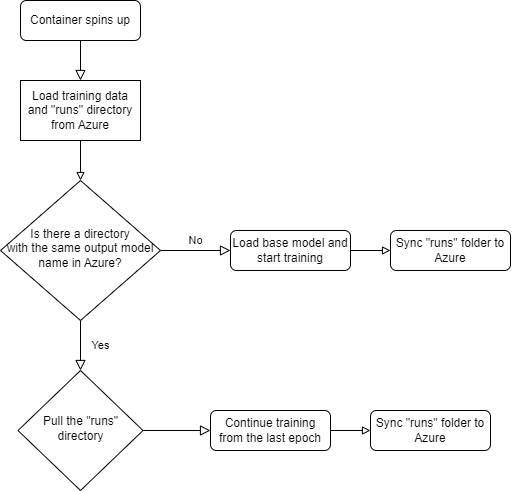
- The script initiates the
train.py. - If a
runsfolder with the same model output name exists, the training resumes. Otherwise, it starts a new training session with the base model.
- The script initiates the
- Regular Sync to Azure: Every minute, the script will copy the contents of the
runsfolder from the container to Azure File Share, maintaining a backup and allowing for process continuity. - Monitoring Training Completion:
- Upon the completion of
train.py, adone.txtfile is created. - The script continuously checks for this file and, once detected, terminates the process.
- Upon the completion of
Training Results:
To ensure a fair and uniform comparison across different YOLOv8 model trainings, we pick a consistent set of hardware and training parameters. We chose the RTX 4080 (16 GB) GPU for all our experiments, priced at a very low rate of $0.28 per hour. Additionally, each training was conducted over 50 epochs, with a batch size of 8, and an image resolution of 640.YOLOv8 Nano Model Training: Efficiency and Speed
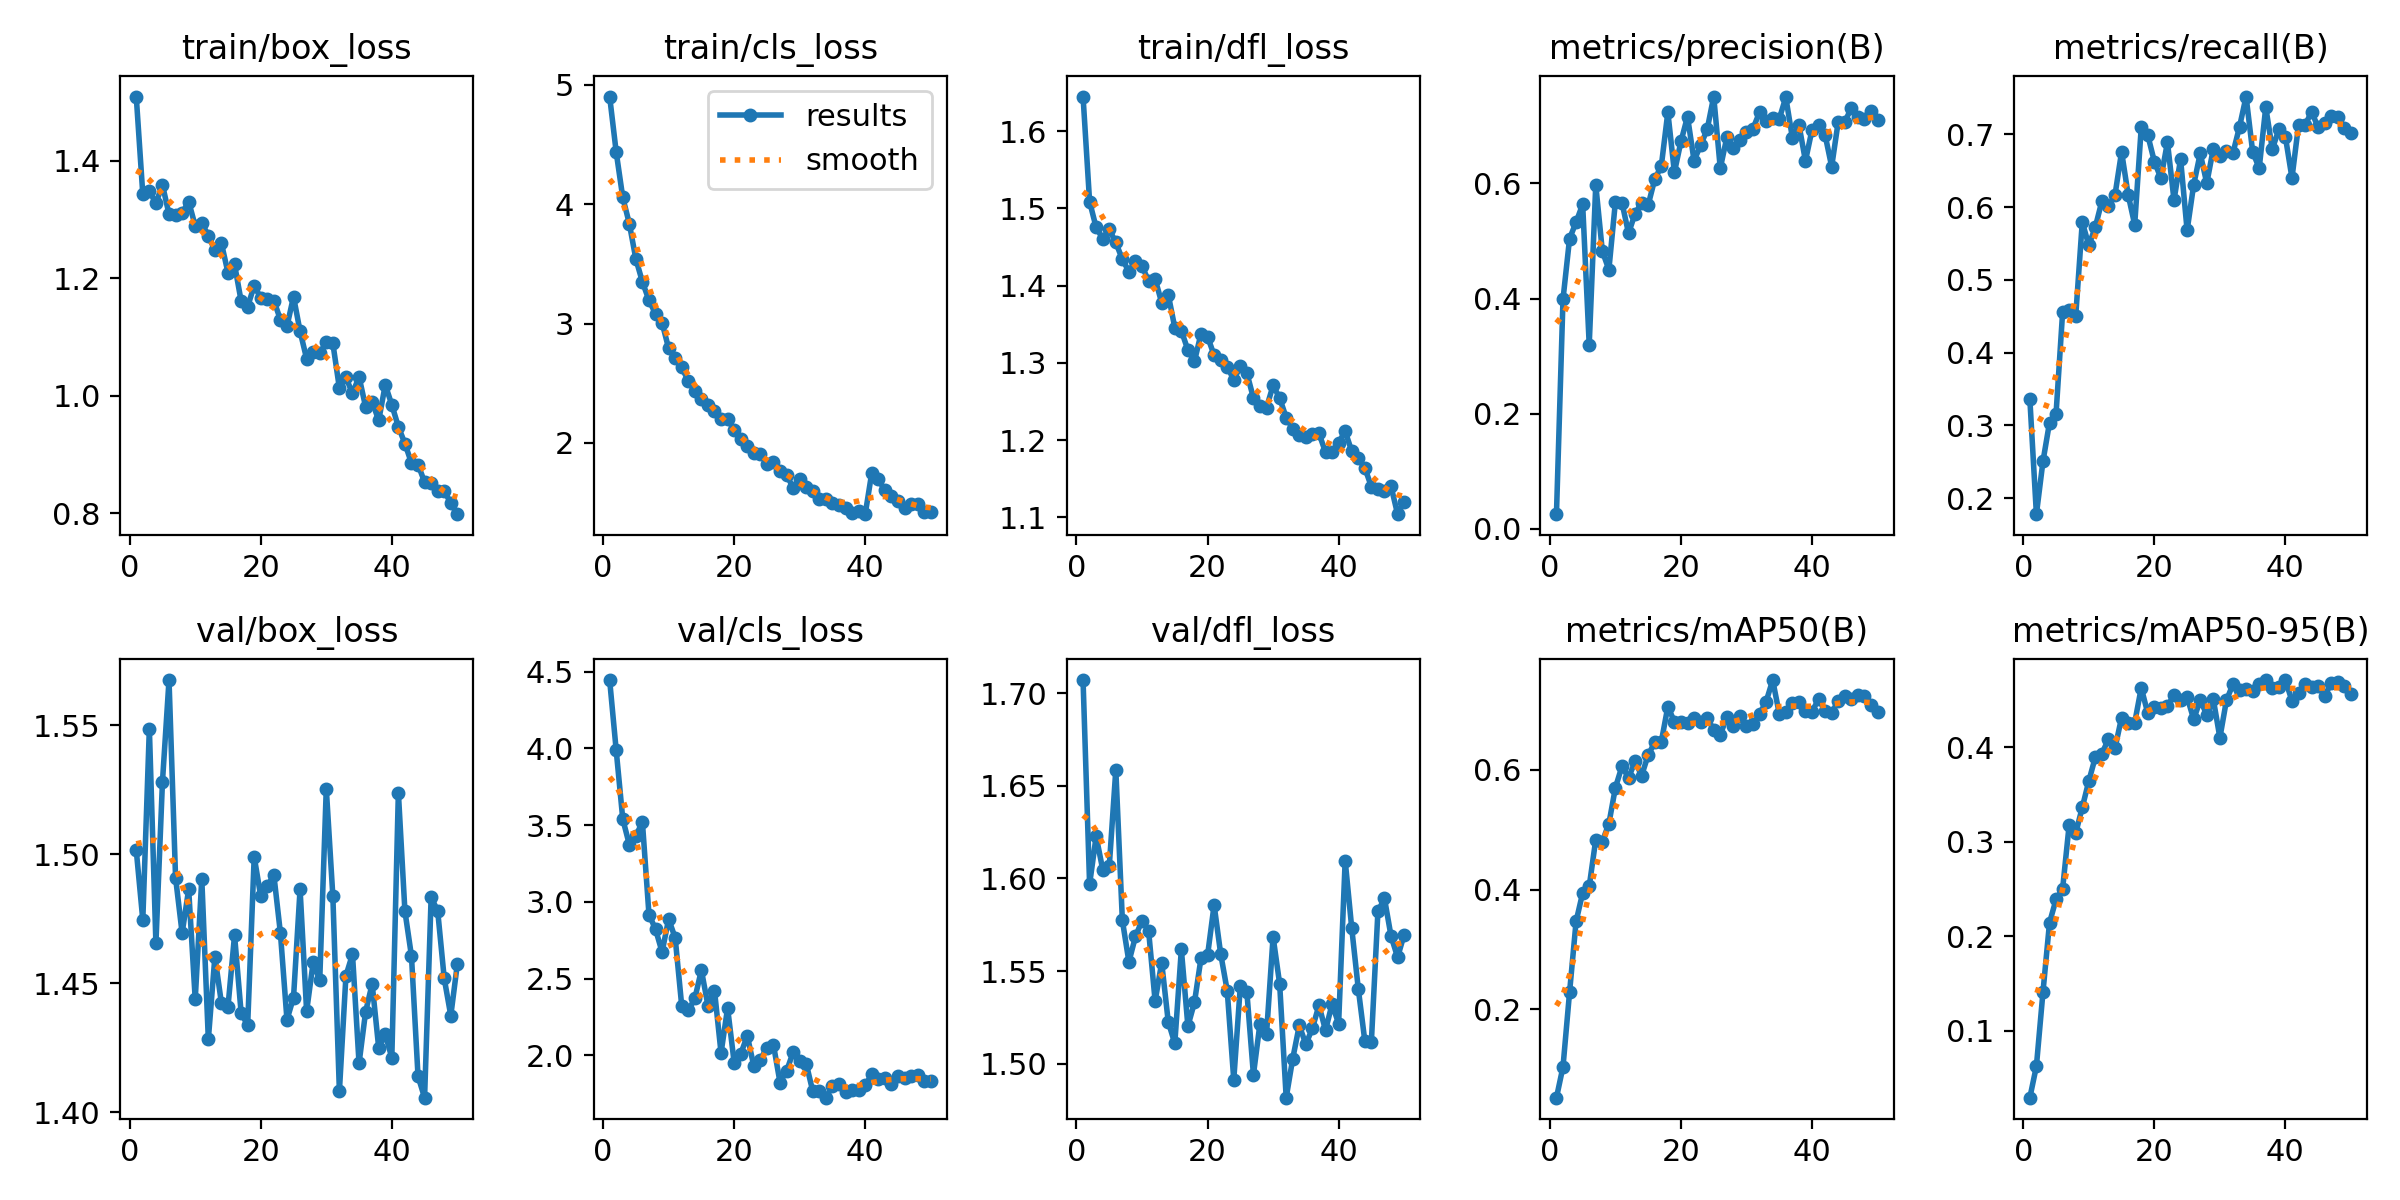
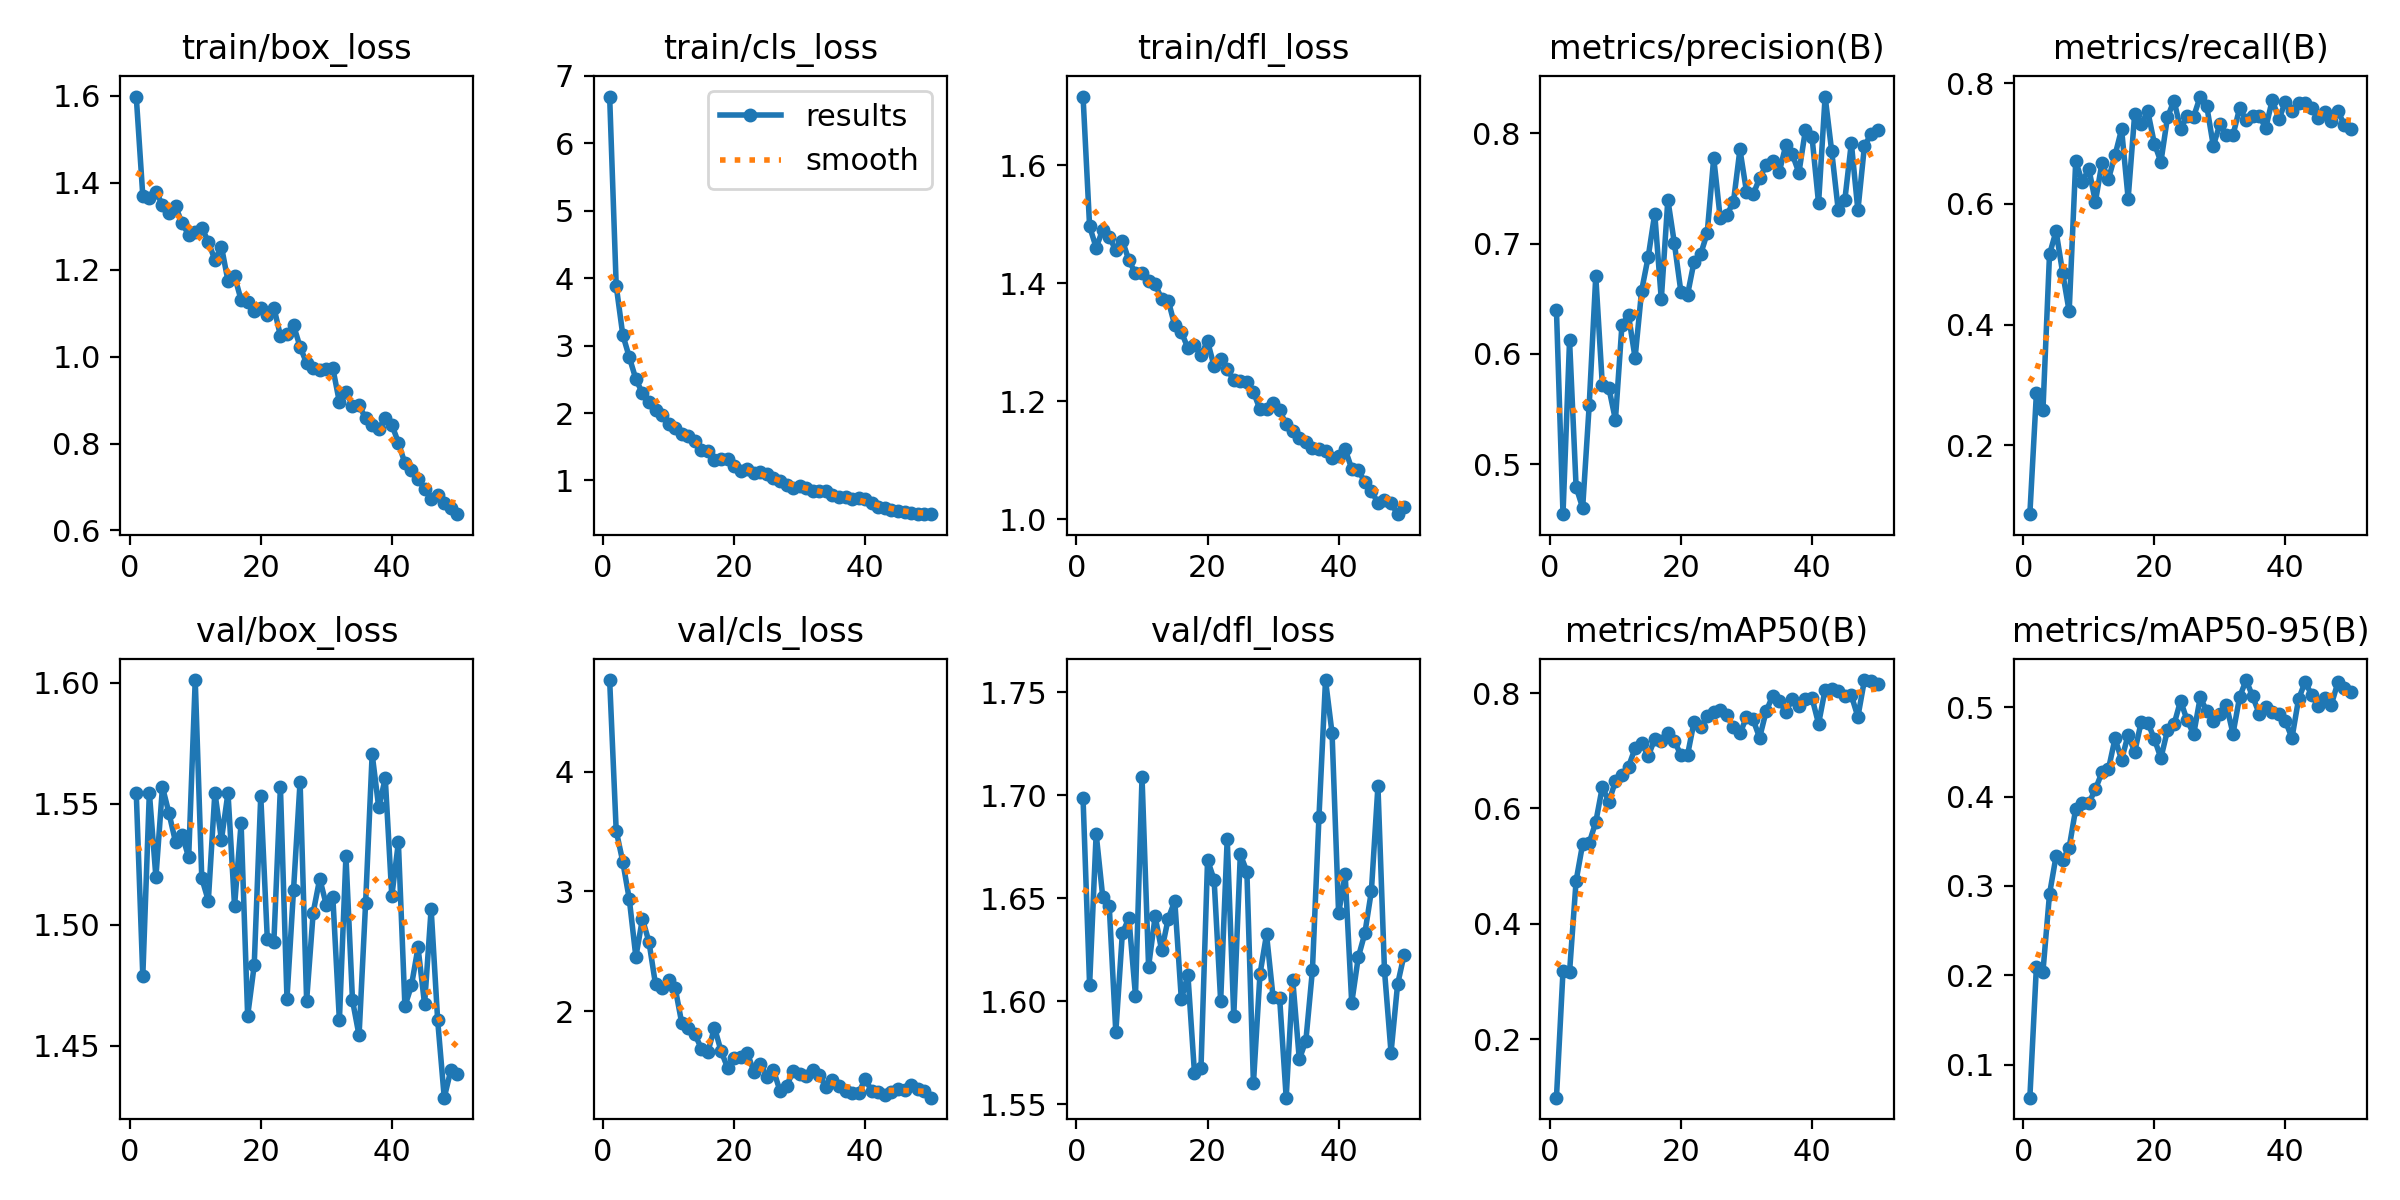
The first model in our comparative study is the YOLOv8 Nano, renowned for its compact yet powerful architecture. With 3.2 million parameters, it is the smallest model in the YOLOv8 family, yet capable of real-time performance, even on CPU-based systems. Duration of Training: Training session for the YOLOv8 Nano model was completed in just about 10 minutes. Which gets us to about 5 cents for training a model. Training results: once our model is trained we can find all the weight along with training and validation results in our Azure storage. We will first check the confusion matrix: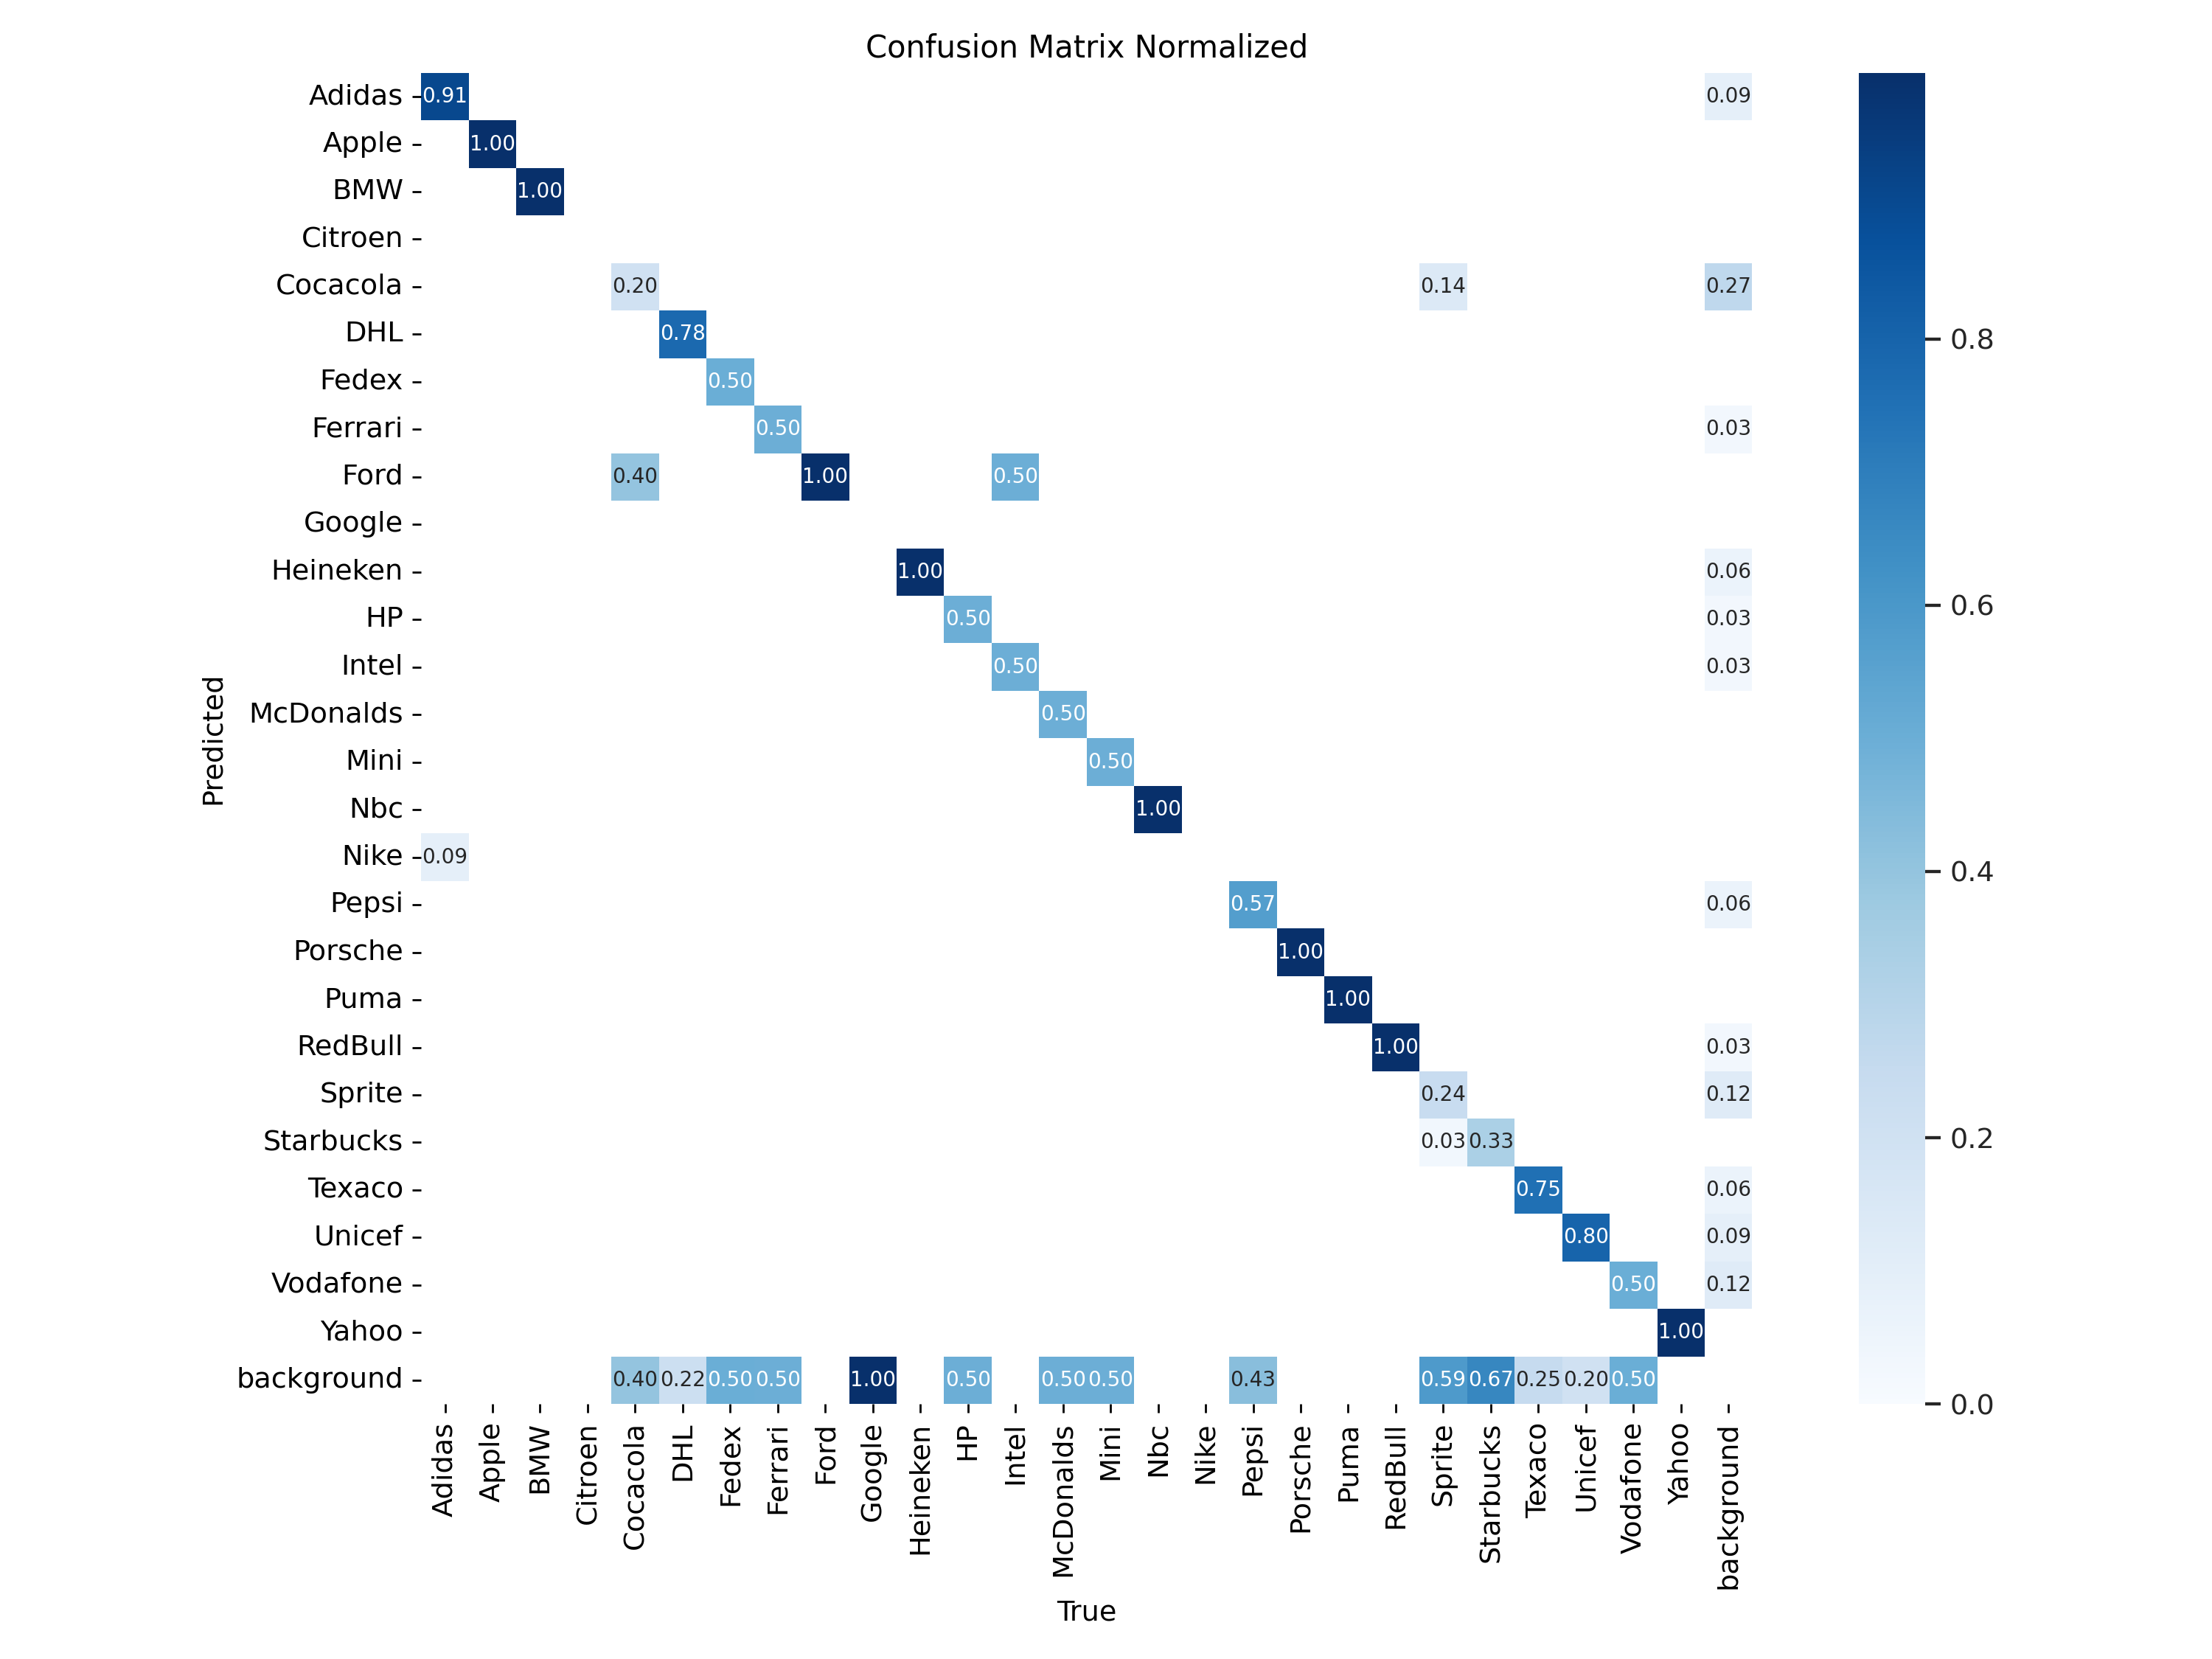
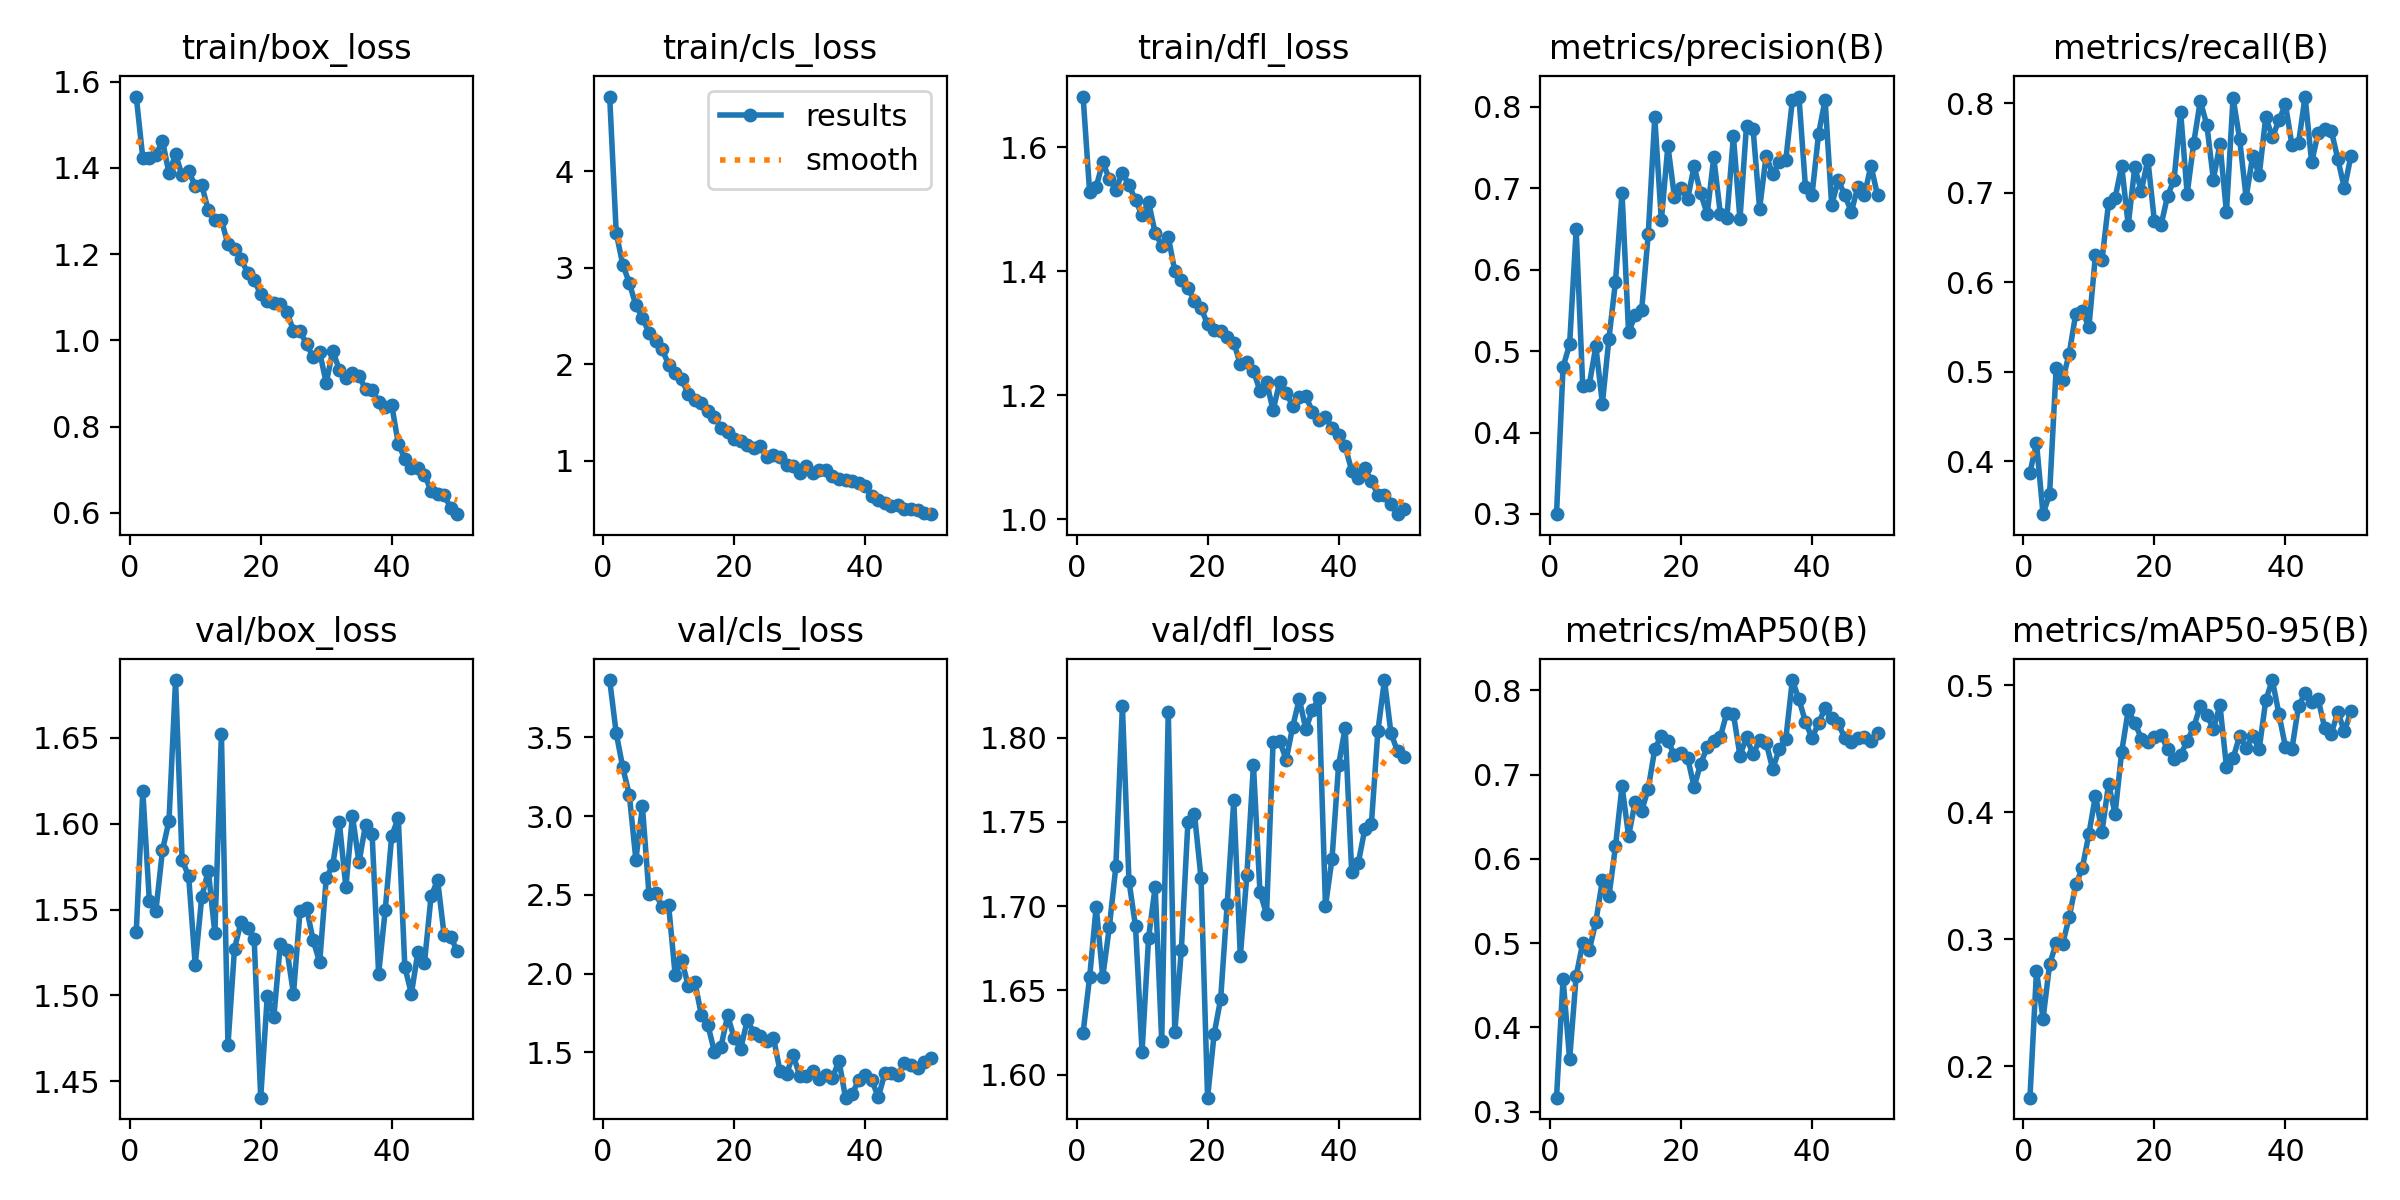
YOLOv8 Small Model Training:
Duration of Training: Training session for the YOLOv8 Small model was completed in about 15 minutes. Trainings Results: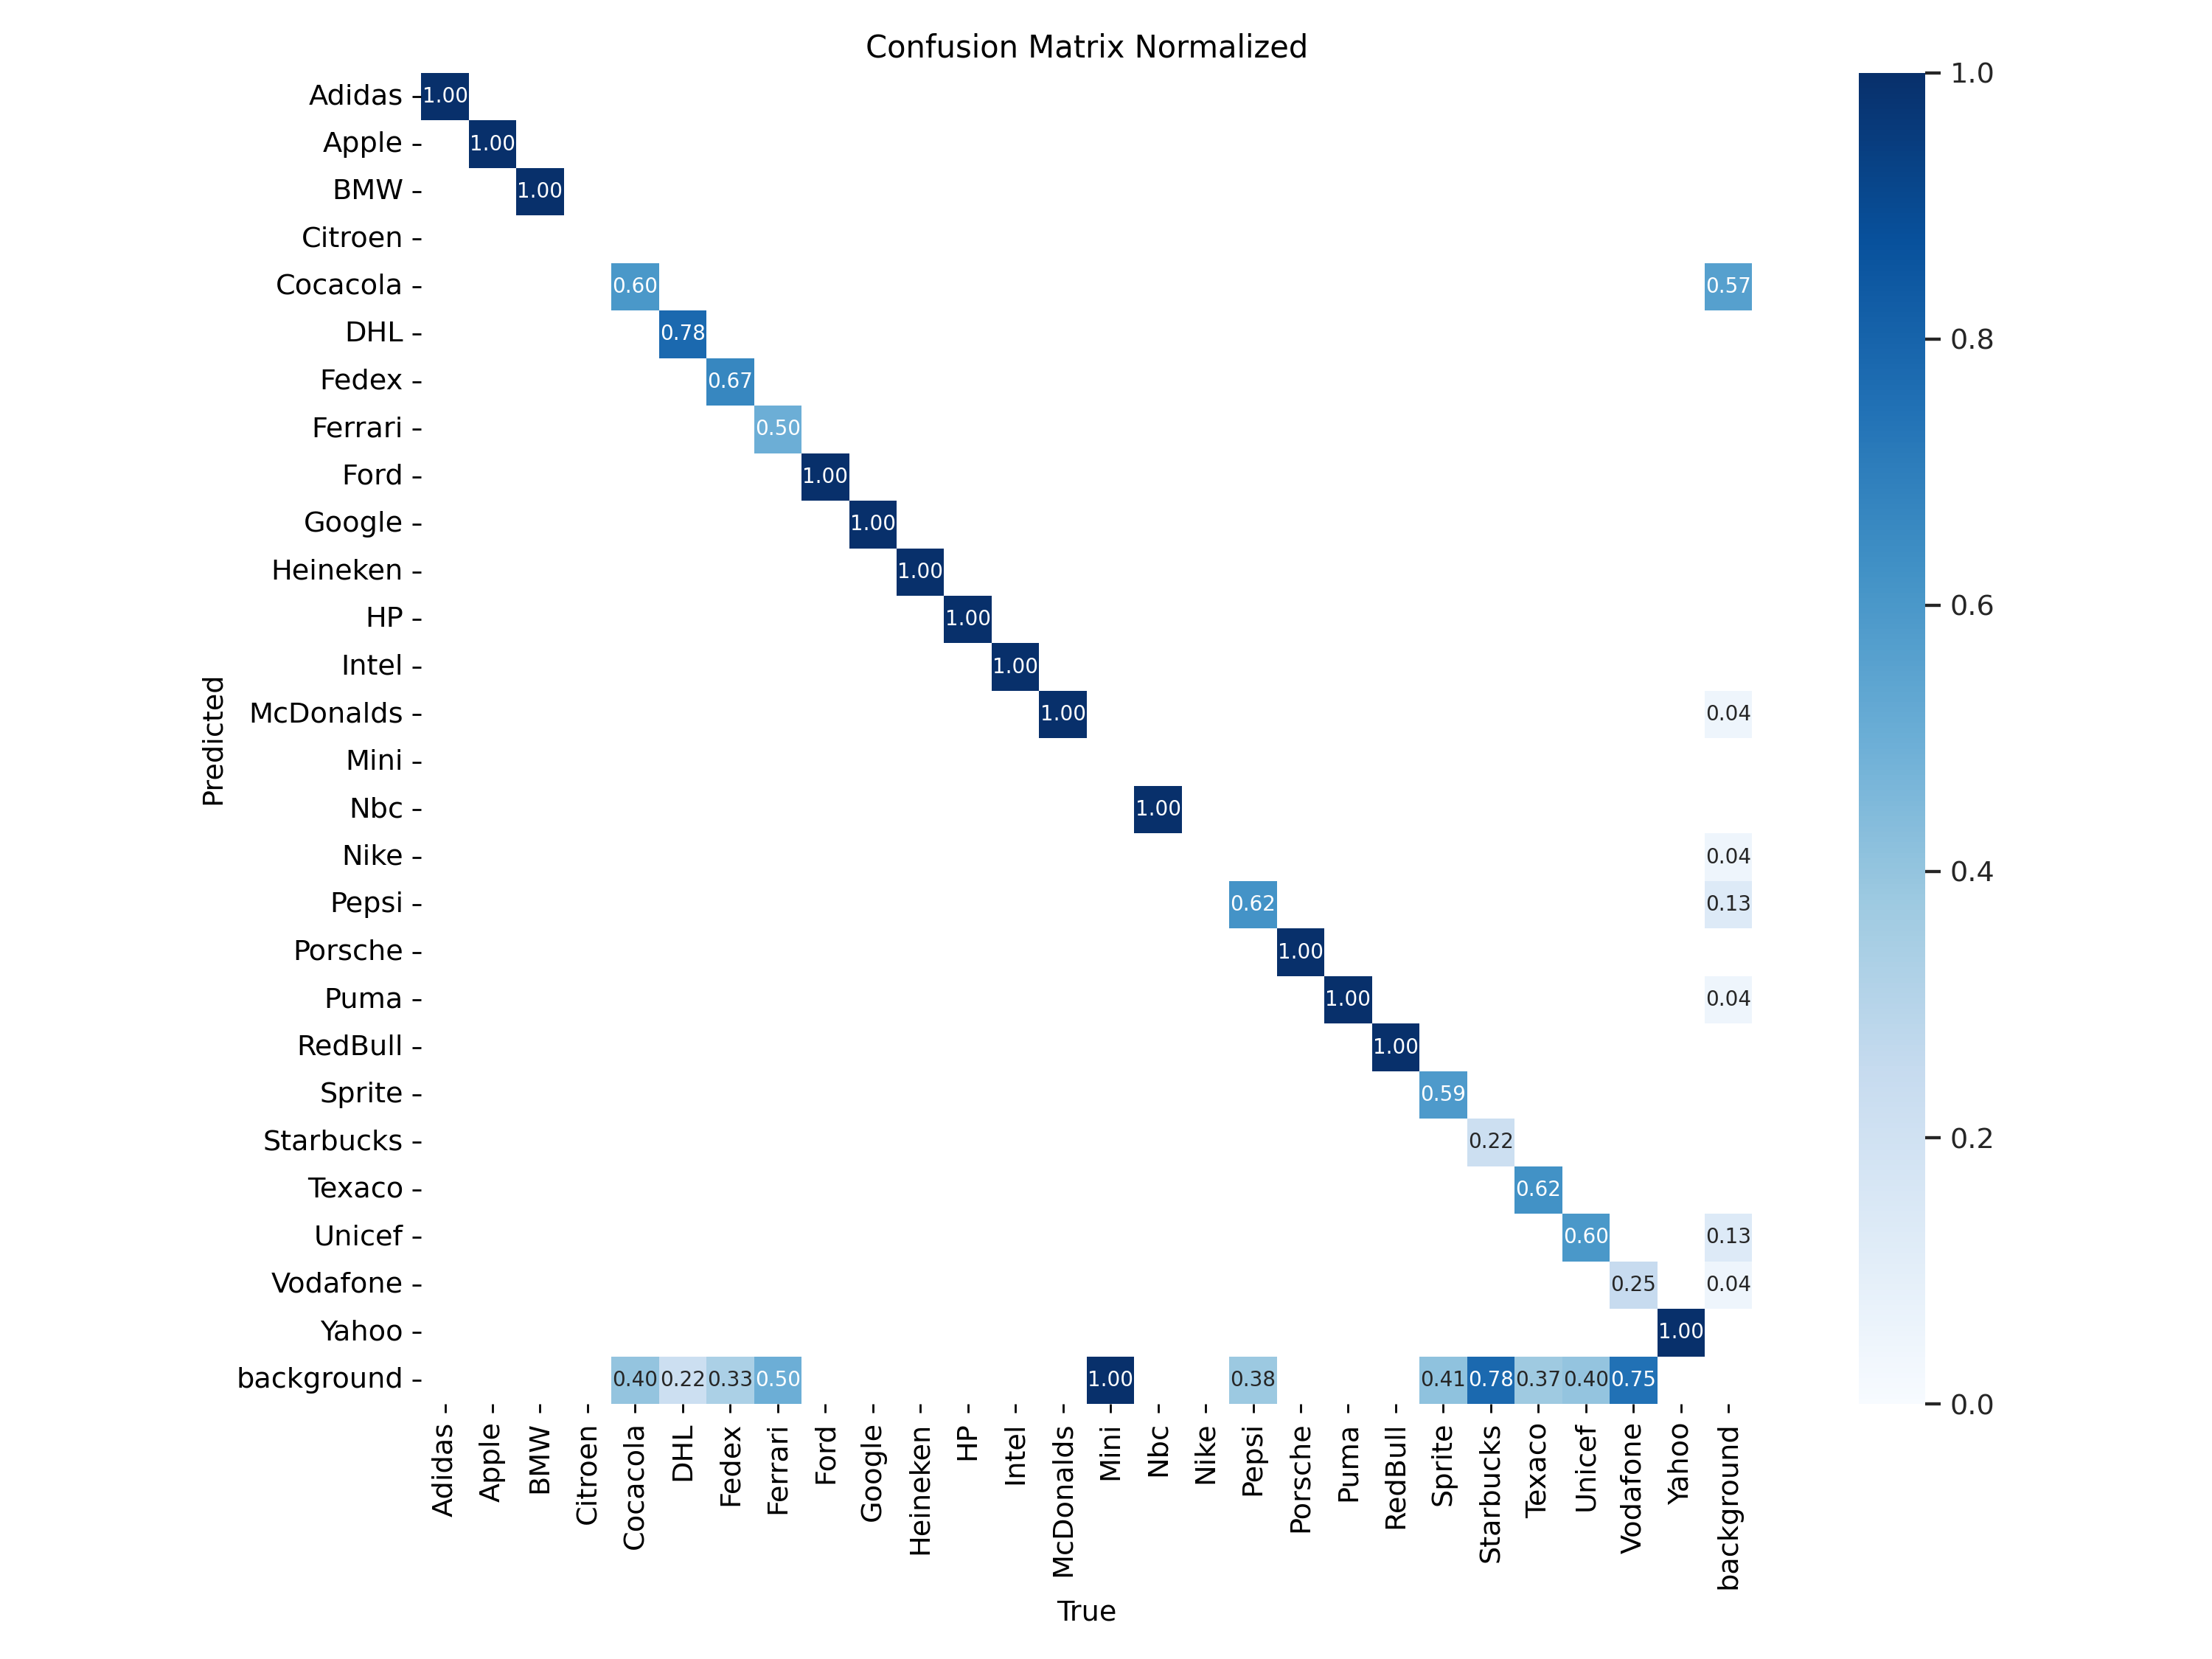

YOLOv8 Medium Model Training:
Duration of Training: Training session for the YOLOv8 Medium model was completed in about 40 minutes. This time we stopped our process and allocated it to the other machine to check if it can start from the last weights we have and it worked successfully. Trainings Results: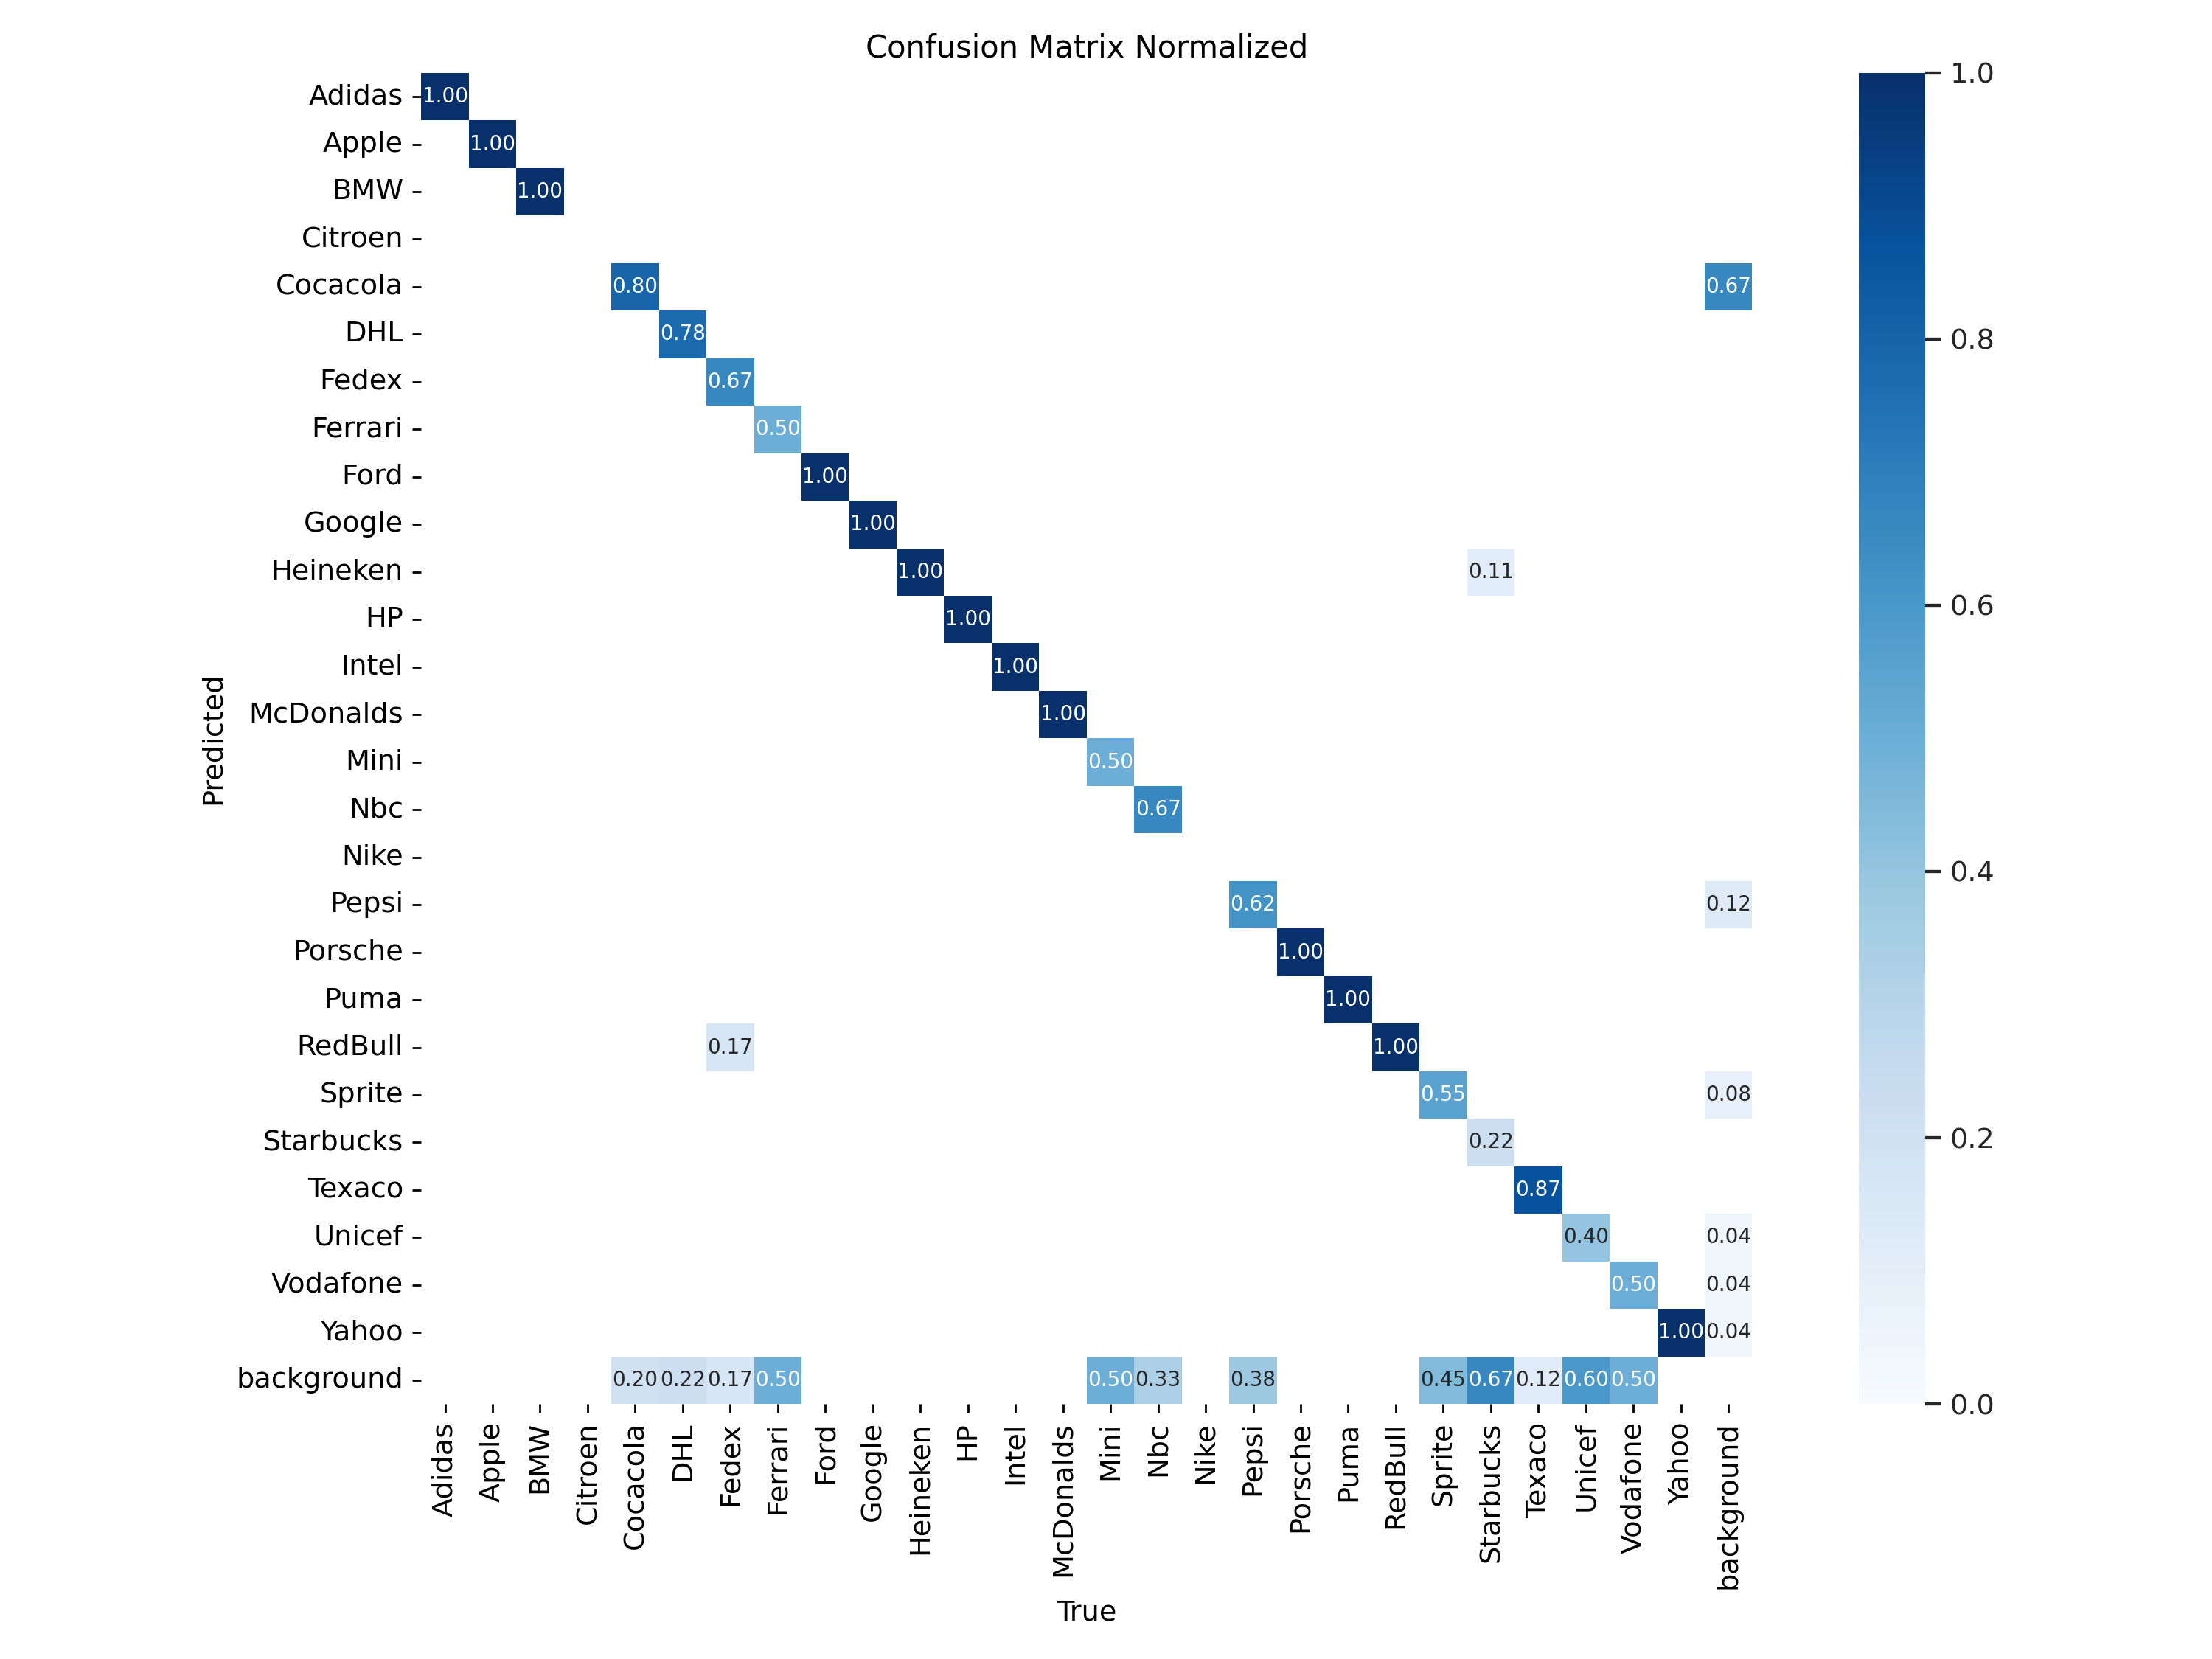
Using custom model in the real life:
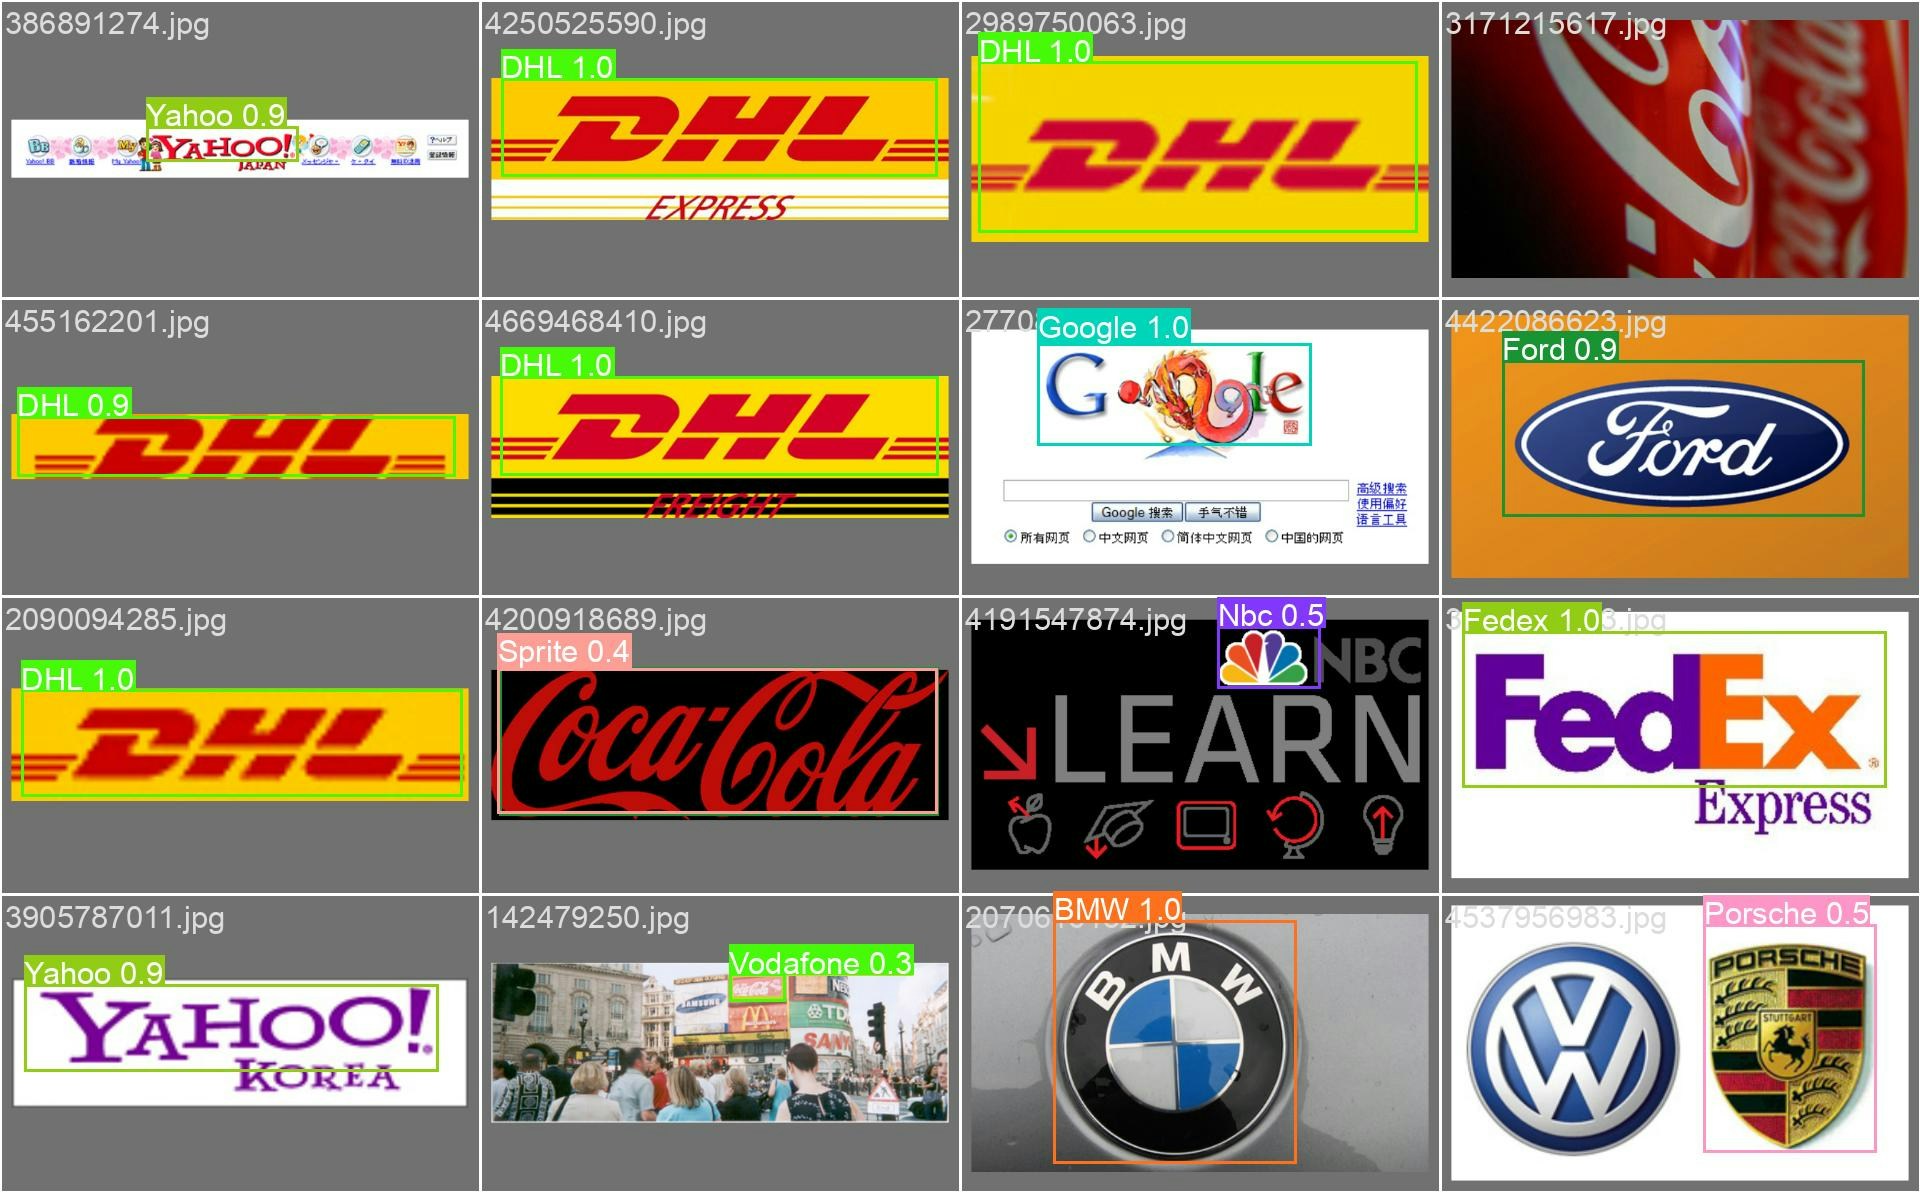
We will now upload the medium model into our inference code and run it on a Coca-Cola video. To do that we just need to specify the model path in our script. Check out our previous article and step by step guide on how to deploy an inference using Salad As a result we can see that we not only can use our custom trained model on images, but even on videos adding tracking
possibilities.
As a result we can see that we not only can use our custom trained model on images, but even on videos adding tracking
possibilities.