Introduction
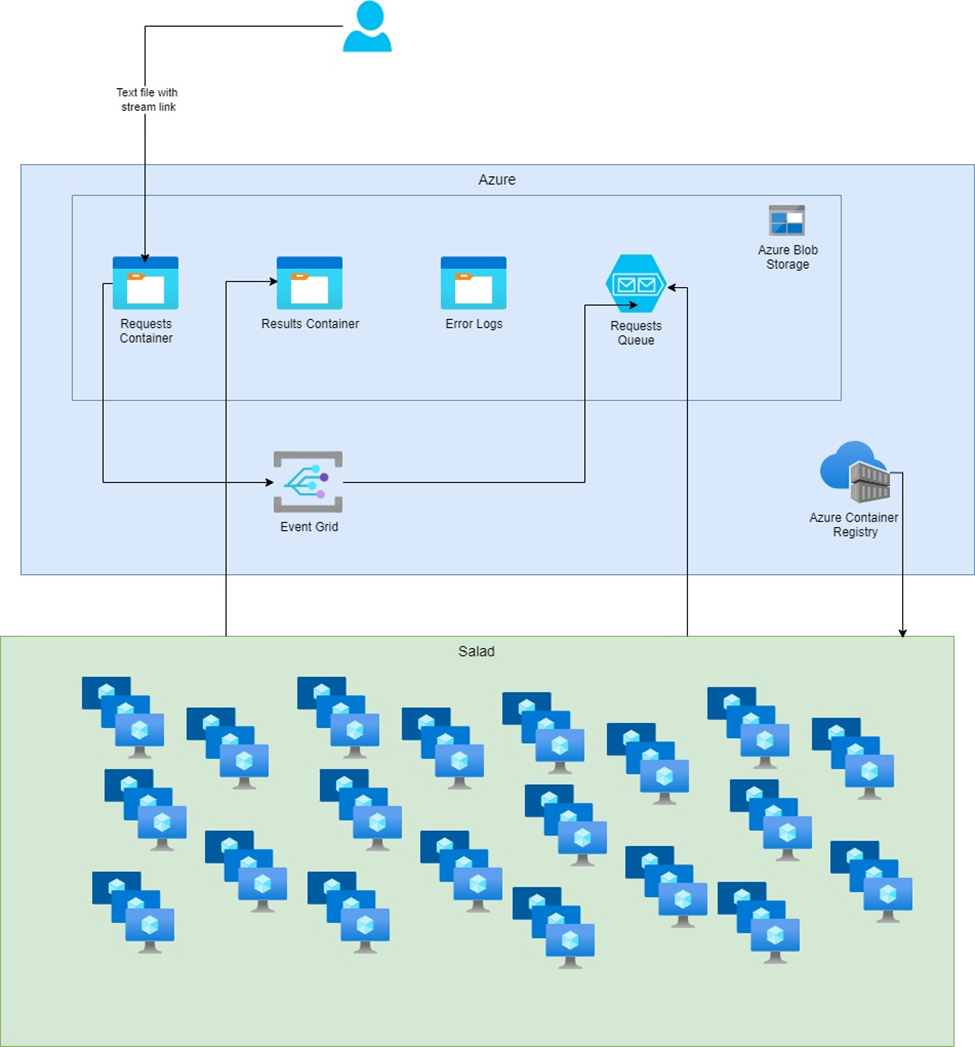
This guide is a continuation of our previous article, focusing on deploying the YOLO model for batch processing on SaladCloud. This approach is ideal for processing large volumes of data where real-time analysis is not required, or if you want to process multiple streams not worrying’s which node will pick the job up. You can check more detailed project overview in our previous guide Fast API for Real-Time Processing here.Reference Architecture for Batch Processing for Asynchronous Workloads
- Objective: Set up a batch processing system that reacts to new video stream links stored in Azure.
- Process Flow:
- Video stream links are saved in an Azure storage container.
- An event grid with subscriptions is configured to monitor the storage container and create a message in a storage queue whenever a new file is added.
- A Python script for batch processing is containerized and deployed across multiple SaladCloud compute nodes.
- This batch process routinely checks the storage queue. When a new message appears, it picks up the corresponding stream for processing.
Folder Structure
Our full solution is stored here: git repo Here is the folder structure we will have once the project is done:Deploy Azure Resources
It’s essential to first deploy the necessary infrastructure on Azure. We will deploy:- Storage Account for storing input and output data
- Blob Containers for organizing the data within the Storage Account (default names: requests, yolo-results, failed-requests)
- Storage Queue for storing messages (default names:
requestqueue,poison-requestqueue). Our batch process will be checking if there are any new messages in the queue. - Event Grid System Topic and Event Subscription for triggering events when new blobs are created in the input container. Every time a new file is created in the requests container a message will be created in the queue.
- Create an Azure Subscription and Resource Group: If you haven’t already, sign up for Azure and create a subscription. Within this subscription, create a resource group that will contain all the resources for your project.
- Login to Azure:
- Open your command line interface (CLI).
- Use the Azure CLI command to log in:
- Set your subscription:
- Deploy resources:
- Navigate to the main.bicep file inside of infrastructure folder and run the following command:
- All resource names are set as parameters, so you can override them:
- Navigate to the main.bicep file inside of infrastructure folder and run the following command:
- Check resources:
- Open your resource group in azure and check the resources. You should see something similar to this:

- Open your resource group in azure and check the resources. You should see something similar to this:
Local Environment
Before we deploy solution on SaladCloud’s infrastructure, it’s crucial to evaluate YOLOv8’s capabilities in a local setting. This allows us to troubleshoot any issues and make any make our solution meet our needs.Local Development Setup: Installing Necessary Libraries
Setting up an efficient local development environment is essential for a smooth workflow. We ensure this by preparing setup and requirements files to facilitate the installation of all dependencies. These files help verify that the dependencies function correctly during the development phase. We provide the complete contents of the requirements file and the setup script below. The Setup Script:Exploring YOLOv8’s Capabilities and Data Compatibility
As we delve into the practicalities of implementing YOLOv8 for object detection, a fundamental step is to understand the range of its capabilities and the types of data it can process effectively. This knowledge will shape our approach to solving the problem at hand. Here is a list of possible inputs: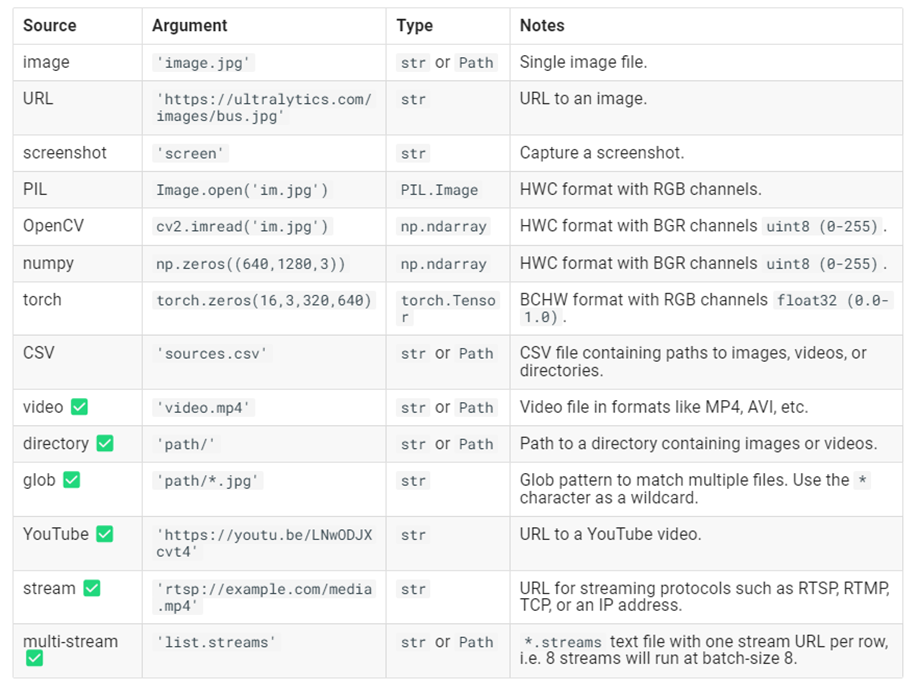
Video processing
We’ll begin by experimenting with an example straight from the Ultralytics documentation, which illustrates how to apply the basic object detection model provided by YOLO on video sources. This example uses the ‘yolov8n’ model, which is the YOLOv8 Nano model known for its speed and efficiency. Here’s the starting code snippet provided by Ultralytics for running inference on a video: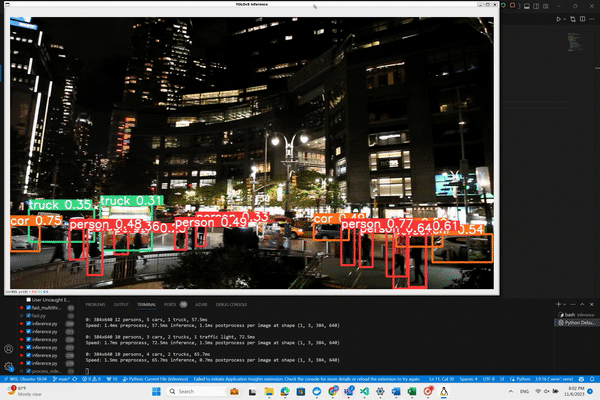
Processing Live Video Stream from Youtube
Now we move on to the task of processing live video streams. While cap_from_youtube works well for YouTube videos by loading them into memory, live streams require a different approach due to their continuous and unbounded nature. Pafy is a Python library that interfaces with YouTube content, providing various streams and metadata around YouTube videos and playlists. To make it work in the virtual environment we had to solve a few libraries issues we discussed earlier. To make the process easier for you run the dev/setup file we also mentioned earlier. For live video streams, Pafy allows us to access the stream URL, which we can then pass to OpenCV for real-time processing. Here’s how we can use Pafy to open a live YouTube stream:Processing Live Video Stream (RTSP, RTMP, TCP, IP address)
Ultralytics gives us an example of running inference on remote streaming sources using RTSP, RTMP, TCP and IP address protocols. If multiple streams are provided in a*.streams text file then batched inference will run, i.e. 8 streams
will run at batch-size 8, otherwise single streams will run at batch-size 1. We will include it in our code as well.
Based on specific link parameters our process will pick which way to process the link. You can check that in the full
script
Implementing Object Tracking
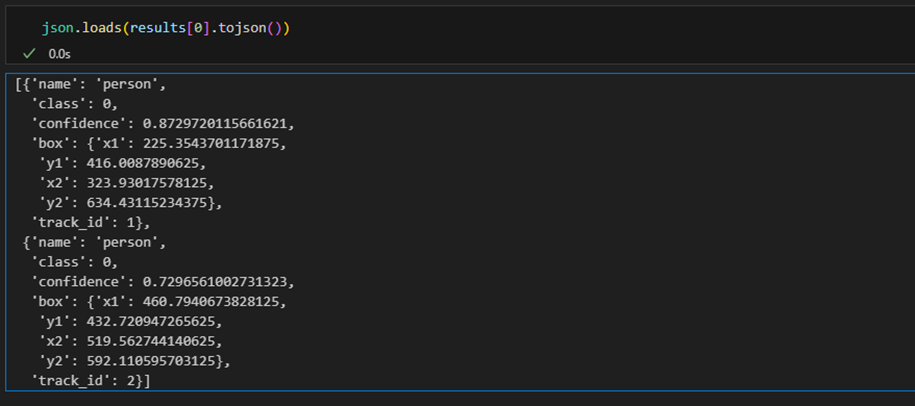
Having established the method to process live streams, the next crucial feature of our project is to track the identified objects. YOLOv8 comes equipped with a built-in tracking system that assigns unique IDs to each detected object, enabling us to follow their movement across frames. There is a way to pick between 2 tracking models, but for now we will just use the default one. Enabling Tracking with YOLOv8: To utilize the tracking functionality, we simply need to modify our inference call. By adding .track to our model call and setting persist=True, we instruct the model to maintain object identities consistently over time. This addition to the code will look like this: That is great, but our main goal is to get a summary of how long an object was present on the video. I will now remove
the appearing window with the bounding boxes and we will pay more attention to the data. For this part of the project we
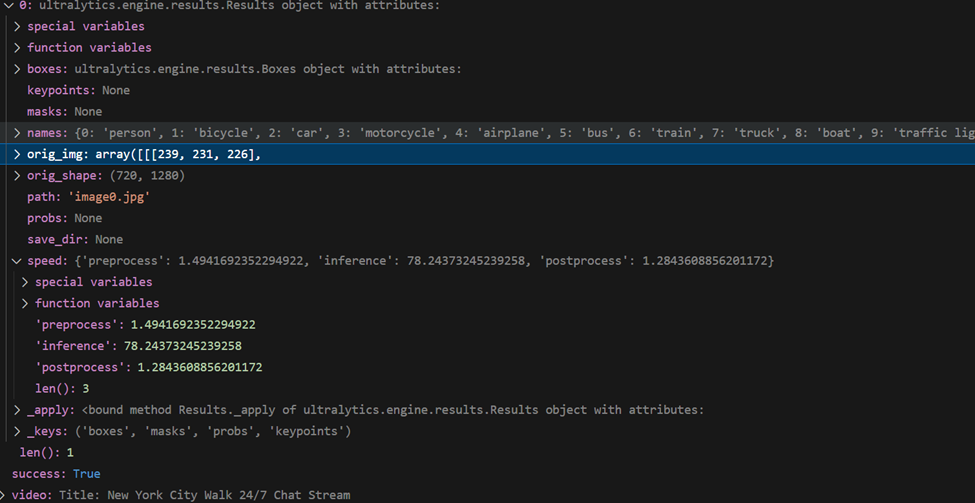
are using Jupyter in vscode and pandas. Let’s check what results object is:
That is great, but our main goal is to get a summary of how long an object was present on the video. I will now remove
the appearing window with the bounding boxes and we will pay more attention to the data. For this part of the project we
are using Jupyter in vscode and pandas. Let’s check what results object is:
Readable summary
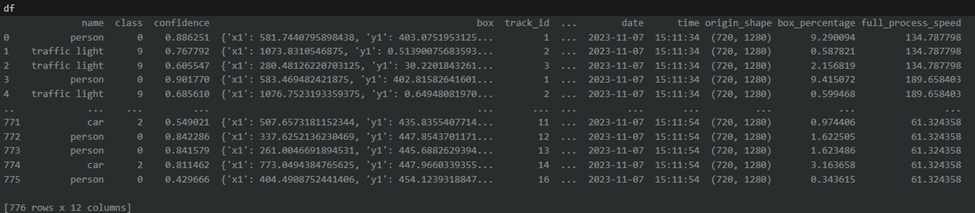
With the DataFrame populated with tracking and detection data, we’re now ready to create a summary that achieves our main goal: calculating the duration each object was present in the video. We’ll start by filtering out any irrelevant data and then proceed to group the valid detections to summarize our findings. Filter data We need to ensure that we only include rows with valid tracking IDs. This means filtering out any detections that do not have a tracking ID or where the tracking ID is 0, which may indicate an invalid detection or an object that wasn’t tracked consistently. Grouping Detections for Summary: With a DataFrame of filtered results, we’ll group the data by tracking ID to find the earliest and latest timestamps for each object. Our object will get a new tracking ID if it leaves and re-enters the video. If in your project you need to track a specific label, you will need to add additional logic of grouping by class and summing the durations. We’ll also determine the most commonly assigned class for each object, in case there are discrepancies in classification across frames, and calculate the average size of the object within the frame. The summary function will perform these operations and output a readable stringRun process on GPU
In our metadata Dataframe the last column “full_process_speed“ reflects a combination of preprocessing, inference and post-processing time. We can see that now we have the processing speed from 60 to 400 milliseconds per frame which is impressive, but we can do better. To unlock the full potential of our solution, we’ve added a simple enhancement: CUDA device detection. With just a few lines of code, our process now intelligently determines if a CUDA-compatible GPU is available and adjusts accordingly.: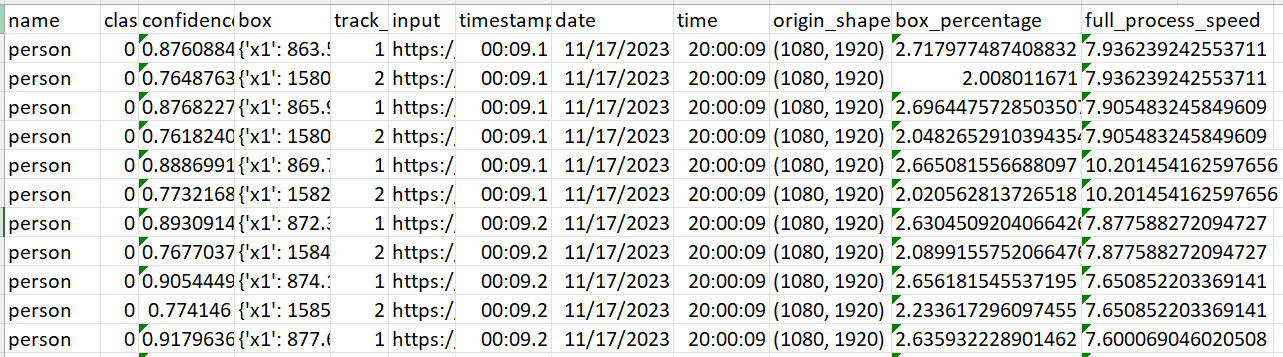
- Timed Saves: We implement logic within the processing loop to save interim results at intervals that will be specified as environment variable. Since stream might be infinite we need to be able to check the results without breaking the connection to the stream.
- Final Save: Ensure all results are saved once the process is completed:
Integrating with Azure for batch processing
To enable efficient batch processing using YOLO on Salad, establishing a connection between the Python code and Azure Storage resources is crucial. We will start with initiating and maintaining connections to containers and storage queue: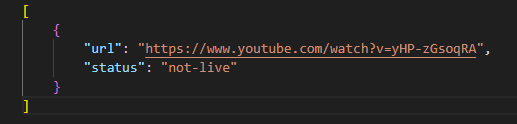
Environment Variables
When deploying a batch processing solution using YOLO on Salad, leveraging environment variables provides a flexible and secure way to configure your application. These variables can be defined during the deployment process and accessed within your container. Here’s how you can integrate environment variables into your Python script for key configurations:STORAGE_CONNECTION_STRING environment variable. If it’s not set, it defaults
to None.
Environment Variables Table
| Environment Variable Name | Functionality | Required | Default Value |
STORAGE_CONNECTION_STRING | Connection string for Azure Storage Account. Should be pulled from azure storage account access keys. | Yes | None |
INPUT_CONTAINER_NAME | Name of the input container in Azure Blob Storage where request files be saved to start the process. Value should match name of resource created in Azure | No | ”requests” |
OUTPUT_CONTAINER_NAME | Name of the output container where the result files be saved to. Value should match name of resource created in Azure | No | ”yolo-results” |
INPUT_QUEUE_NAME | Name of the queue for incoming requests. Value should match name of resource created in Azure | No | ”requestsqueue” |
SAVE_EVERY_MINS | Interval for saving results (in minutes). | No | 30 |
QUEUE_CHECK_TIMER | Interval for checking the queue (in seconds). | No | 60 |
Containerizing code with Docker
The next crucial step is to package our solution into a Docker image. This approach is key to facilitating deployment to our cloud clusters. Containerizing with Docker not only streamlines the deployment process but also ensures that our application runs reliably and consistently in the cloud environment, mirroring the conditions under which it was developed and tested. When creating the Dockerfile, it’s crucial to select a base image that includes all the necessary system dependencies, because that might cause some networking issues. We’ve tested our solution with “python3.9“ base image, so if possible stick to it. If you have to use a different base image for any reason check out SaladCloud documentation on networking. Here is the full Dockerfile we will use to build an image:Deploying Solution to Salad
We finally got to the last and most exiting part of our project. We will now deploy our full solution to the cloud. Deploying your containerized application to SaladCloud’s GPU Cloud is a very efficient and cost-effective way to run your object detection solution. SaladCloud has a very user-friendly interface as well as an API for deployment. Let’s deploy our solution using SaladCloud portal. First create your account and log into https://portal.salad.com/ Create your organization and let’s deploy our container app. Under container groups click “Deploy a Container Group“: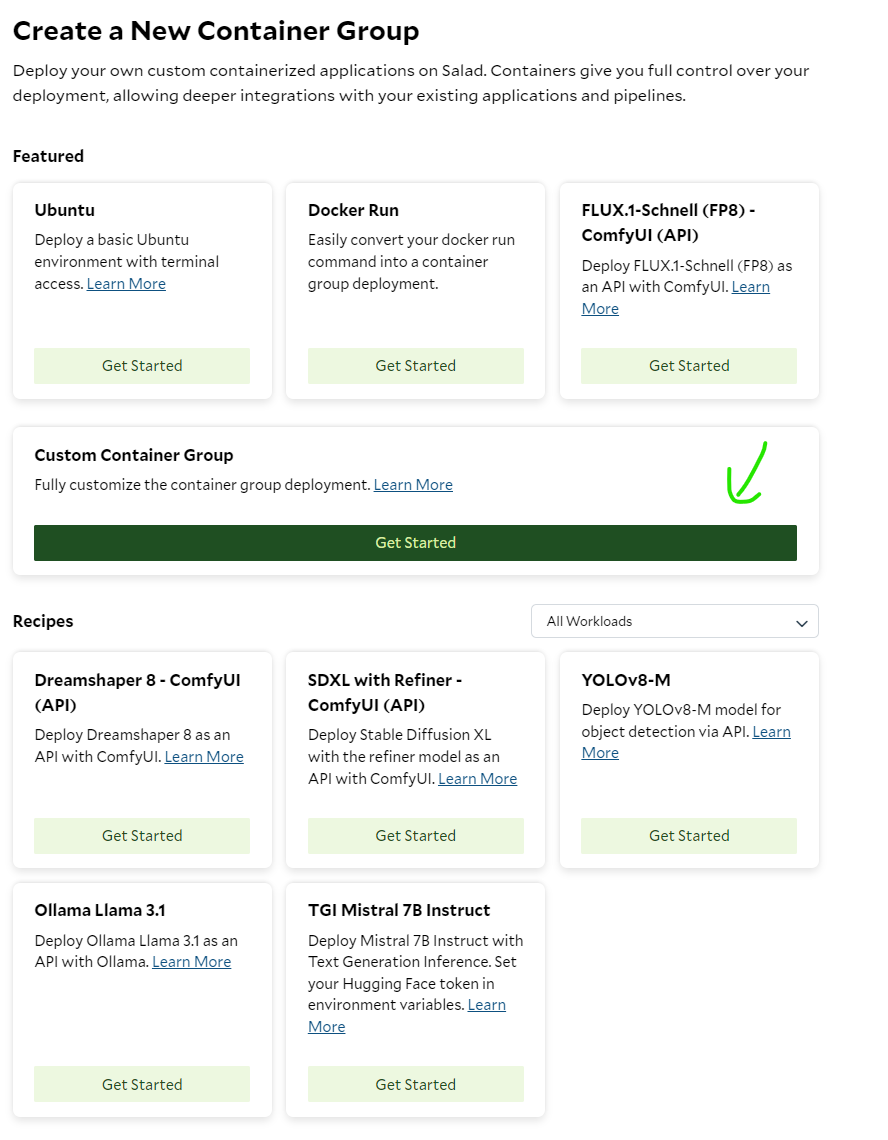
- Create a unique name for your Container group
-
Pick the Image Source: In our case we are using a private Azure Container Registry. Click Edit next to Image
source. Now switch to “Private Registry“, under “What Service Are You Using“ pick Azure Container Registry. Get back
to your azure portal and find the image name, username and password of our container registry repository. Find your
acr in azure and click “repositories“ on the left

docker pull {image name}:
- Replica count: This will define how many videos can be processed simultaneously. For example if we have 10 containers we can put 10 files with links and they will all be picked up one by one.
- Pick compute resources: That is the best part. Pick how much cpu, ram and gpu you want to allocate to your process. The prices are very low in comparison to all the other cloud solutions, so be creative.
-
Environment variables: This is where we need to add our environment variables we went through above. Specify them
in a key-value format:

Benefits of Using Salad
- Cost-Effectiveness: SaladCloud offers GPU cloud solutions at a more affordable rate than many other cloud providers, allowing you to allocate more resources to your application for less.
- Ease of Use: With a focus on user experience, SaladCloud’s interface is designed to be intuitive, removing the complexity from deploying and managing cloud-based applications.
- Documentation and Support: SaladCloud provides detailed documentation to assist with deployment, configuration, and troubleshooting, backed by a support team to help you when needed.
Test Full Solution deployed to Salad
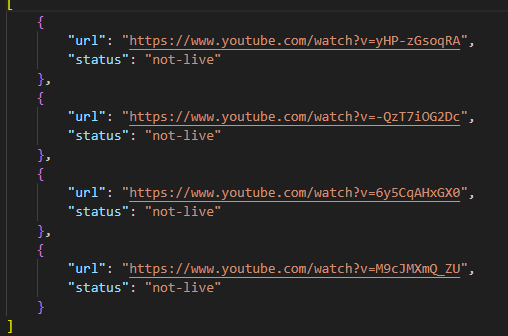
Once your solution deployed on SaladCloud you can put a file in the requests container and check the results. Ones the video is processed 2 files will be saved to results container:
Conclusions
Our journey into the realm of object detection using YOLOv8 and deploying it on SaladCloud’s GPU cloud has been both challenging and rewarding. We’ve successfully navigated through all stages of development and deployment of our solution. Batch processing with SaladCloud is a great solution that can provide simultaneous processing of files together with cost savings. For those who might be interested we’ve also implemented multithreading functionality to our solution. With multithreading you can process several streams simultaneously at one node by providing multiple links in the request file: